Monitoring email while in Journal mode
Written By Eric Heller
Last updated 2 months ago
This article describes the daily monitoring tasks to perform while INKY is operating in Journal mode. Journal mode allows administrators to review detected threats, validate detection accuracy, and make informed policy decisions. This process helps prepare INKY to operate at peak efficiency before you move users to the Include Group, where INKY actively modifies or blocks email.
Prerequisite: Only users with a Super Admin or Policy Admin account can perform all Journal mode tasks.
This article includes:
A definition of Journal mode.
High-level process for monitoring email while INKY is operating in Journal mode.
Examples of how to review email by recommended threat category, including available actions.
Detailed steps for monitoring email while INKY is operating in Journal mode.
Journal mode
Journal mode is the initial phase of INKY deployment. During this phase, INKY passively monitors all inbound organizational email without altering message delivery or the user email experience. No banners, warnings, or message modifications are applied.
This mode enables administrators to observe how INKY classifies and analyzes email traffic, establish a baseline for normal activity, and identify potential threats within the environment.
Administrative Review and Tuning
The purpose of Journal mode is to identify emails that may require different handling and to refine policies accordingly. While operating in Journal mode, administrators can preview protection banners that display the threat level and category INKY assigned to each email and evaluate detection results without affecting delivery. This review helps determine which email addresses or domains to add to allowlists or blocklists and how to handle messages sent to highly targeted users within the organization.
These actions help INKY learn the organization’s preferences so when transitioning end users to the Include Group where INKY provides full protection, future emails are handled correctly and consistently based on validated policies.
Observations page
The Observations page provides access to every email processed by INKY for all teams that belong to the root organization.
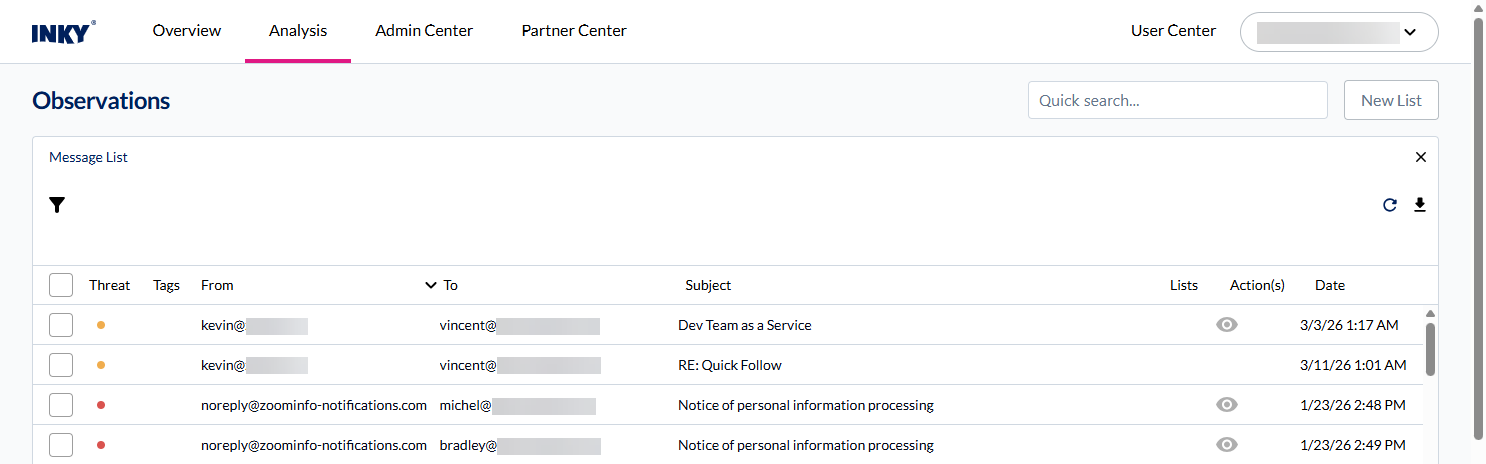
Each message includes comprehensive threat intelligence, delivery routing details, and available remediation actions.
The details for each email includes options for addressing the email, comprehensive threat intelligence conveyed in the banner, and a number of analysis tabs.
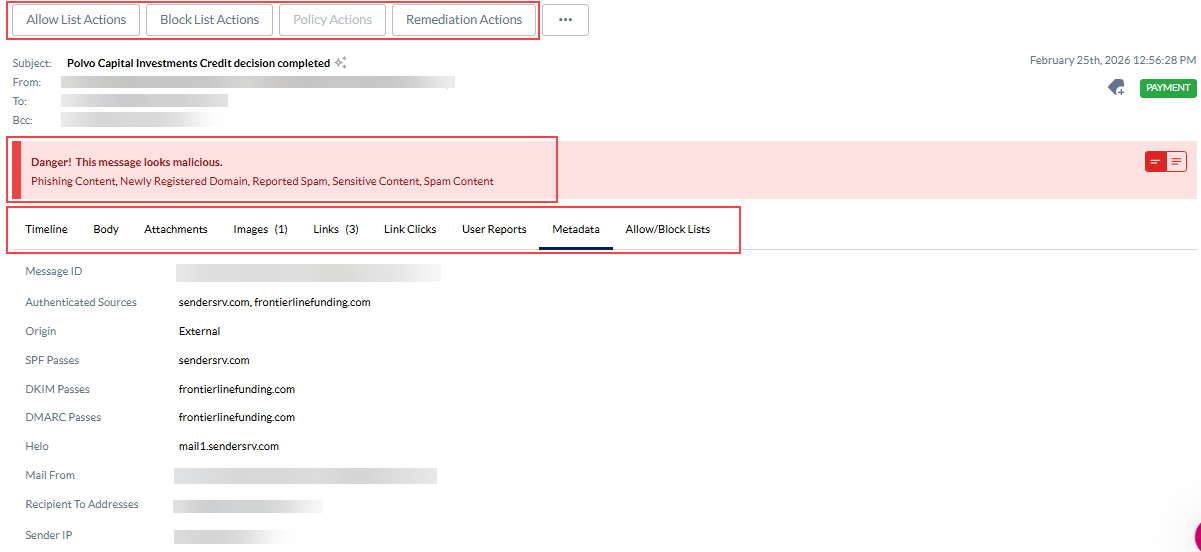
For more information about the Observations page, see Observations.
Process overview
This section describes the high-level steps admins perform to monitor emails while INKY is operating in Journal mode.
1. Filtering the email list.
1. Filtering the email list.
Filtering the email list helps you focus on higher‑priority emails that require closer review.
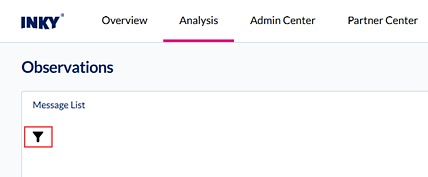
Start by filtering emails by threat category. To access threat categories, navigate to Analysis > Observations, and then click the Filter icon.
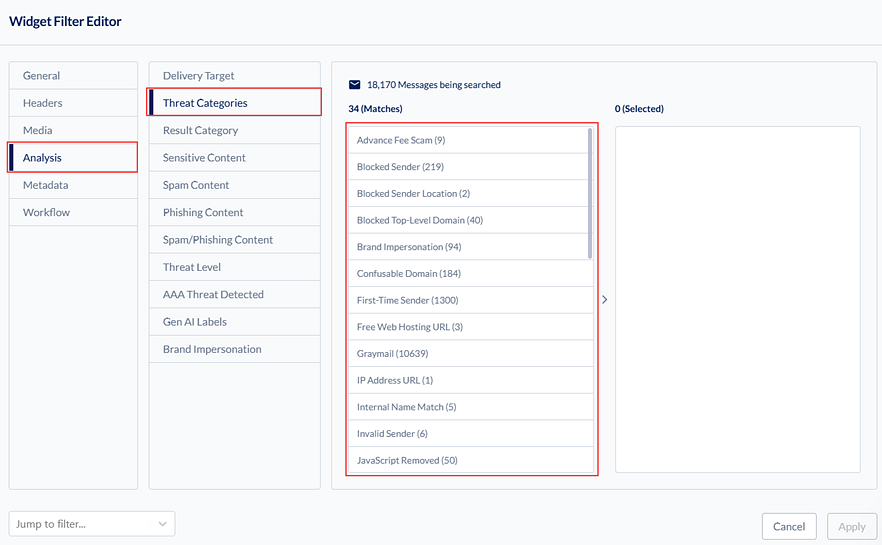
In the Widget Filter Editor, select Analysis > Threat Categories. The threat categories for which INKY has found messages are listed along with the number of emails included in each category.
Recommended threat categories
We recommend analyzing the threat categories described below one at a time. Reviewing and addressing emails in each category helps fine-tune INKY for your environment and improves detection accuracy before you move users to the Include Group.
Note: If one or more categories are not listed, INKY has not identified emails that meet the criteria for those categories at this time.
Possibly Misconfigured Service: INKY detected an email sent by a third‑party service that is not authorized in the domain’s SPF record.
Spoofed Internal Sender: INKY detected an email that appears to originate from within your organization but was actually sent from an external source.
Internal Name Match: INKY detected an email from an external sender whose display name matches the first and last name of an internal employee.
Spoofed VIP: INKY detected an email sent from outside your organization where the sender’s name matches a user on your VIP list, but the sending address is not included in that list.
Select the desired category and click Apply.
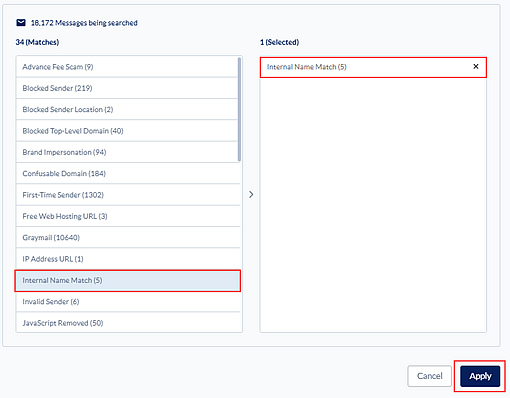
Emails that apply to the category are listed.
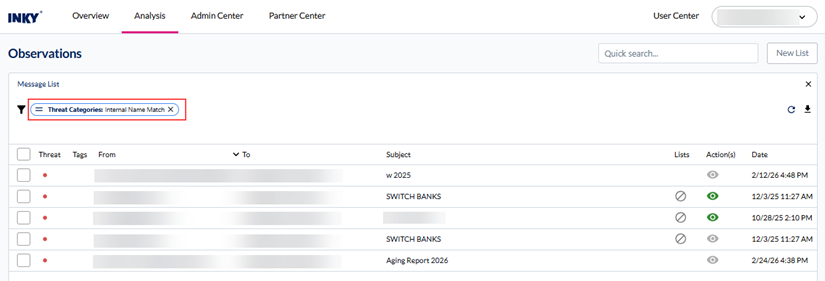
For examples of how to analyze emails in each category, see the section Threat category examples.
Recommendation: In addition to analyzing the threat categories above, we recommend identifying categories with a high volume of emails or categories where email volume appears unusually high. For example, Graymail often contains a large number of messages and may require a baseline review.
For descriptions of all available filters, see the article Observations.
2. Reviewing specific emails.
2. Reviewing specific emails.
After filtering emails by the desired threat category, you can analyze individual emails. When you click an email in the Message List, INKY displays a detailed analysis of the message in the Details panel. Details include comprehensive threat intelligence and security findings, such as:
Banners with threat level indicators (Danger, Caution, Neutral).
Sender and recipient details.
Links clicked by users.
Matched allow list and block list policies.
The Metadata tab contains most of the information required to analyze emails associated with the threat categories listed above. Note that the banner and Metadata tab indicate INKY is operating in Journal mode. The Delivery Target field shows the action INKY would have taken had this email been sent to a user in the Include Group.
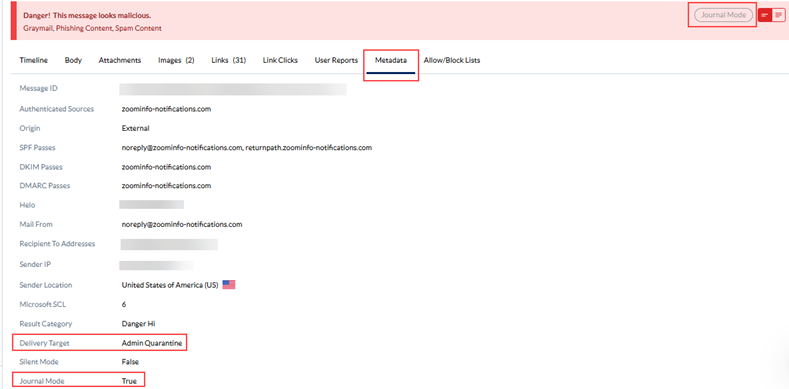
3. Acting on emails as needed.
3. Acting on emails as needed.
Available actions appear at the top of the email. Each action includes multiple criteria options. You can select more than one criteria option.
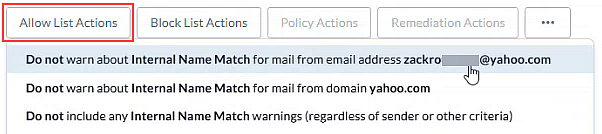
Allow List Actions: Use allow list actions to add sender, domain, or other attributes to the allow list.
Block List Actions: Use block list actions to add sender, domain, or other attributes to the block list.
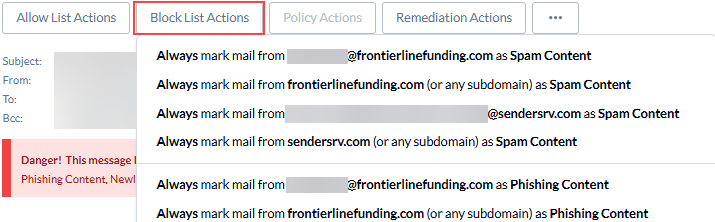
Policy Actions: The Policy Actions button is available only when INKY determines that the threat category for the email is Possibly Misconfigured Service or Spoofed Internal Sender. It includes options for adding the sender as a trusted third-party sender.

Remediation Actions: This gives you the option to delete the email from all INKY protected mailboxes.

Threat category examples
This section provides an example of how to review an email for each recommended threat category and describes the actions available to you. While in Journal mode, the primary goal is to prevent legitimate emails from being incorrectly flagged by INKY.
When an email is correctly identified as malicious, you can add the sender to the block list to ensure INKY automatically blocks future emails from that sender.
Possibly Misconfigured Service
Possibly Misconfigured Service
Possibly Misconfigured Service indicates that INKY detected an email sent by a third‑party service that is not authorized in the domain’s SPF record.
An SPF (Sender Policy Framework) record defines which IP addresses and mail servers are permitted to send email on behalf of a domain. If an email is sent from an unauthorized source, INKY flags the message as potentially misconfigured.
Example Scenario
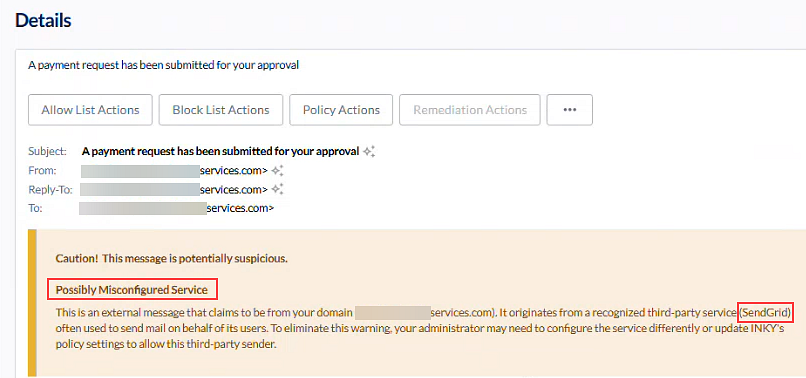
In this example, an email is sent from a user in the services.com domain to another user in the services.com domain. However, the Caution banner indicates that although the message claims to originate from the organization’s own domain, INKY determined that the email was actually sent using SendGrid, a third‑party email service that is not included in the domain’s SPF record.
Because SendGrid is not authorized to send email on behalf of services.com, INKY classifies the message as Possibly Misconfigured Service.
Verifying the Sender
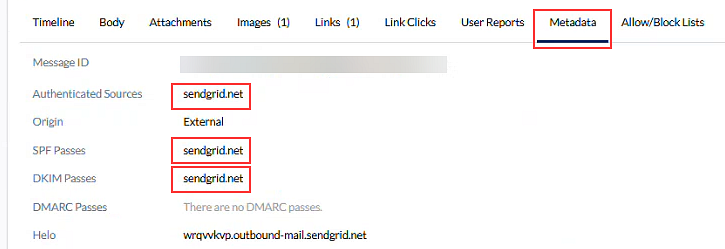
You can confirm the source of the email from the Metadata tab by reviewing the following fields:
Authenticated Sources
SPF Passes
DKIM Passes
These fields indicate that sendgrid.net was used to send the message.
Impact
A misconfigured service can result in a large number of Caution‑classified emails for the affected domain. This may increase alert noise and reduce the effectiveness of threat triage.
Resolution Options
To address this issue, an administrator can take one of the following actions:
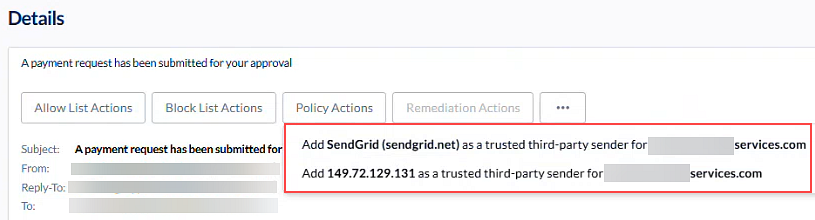
Trust the third‑party sender in INKY: Click Policy Actions and select an option to add SendGrid as a trusted third-party sender.
Update the domain’s SPF record: Modify the services.com SPF record to include sendgrid.net as an authorized sender.
Either option prevents legitimate emails sent through SendGrid from being flagged as Possibly Misconfigured Service going forward.
Spoofed Internal Sender
Spoofed Internal Sender
Spoofed Internal Sender means INKY detected an email that looks like it came from someone within your organization, but was actually sent from an external source.
Example Scenario
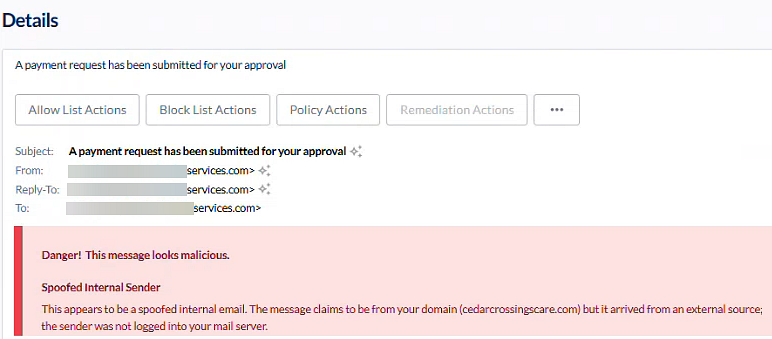
In this example, an email is sent from a user in the services.com domain to another user in the services.com domain. But the message was sent through a server that isn’t authorized by services.com.
Because the email appears to come from the organization’s own domain but wasn’t sent by an approved server, INKY displays a Danger banner to warn users about a possible spoofed internal email.
Verifying the Sender
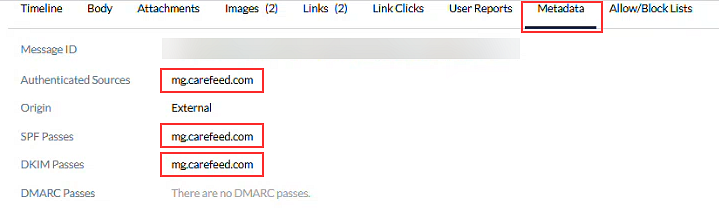
You can confirm the source of the email from the Metadata tab by reviewing the following fields:
Authenticated Sources
SPF Passes
DKIM Passes
These fields indicate that mg.carefeed.com was used to send the message.
Impact
Spoofed internal emails are a common tactic used in phishing and impersonation attacks. If legitimate services aren’t properly configured, they can also trigger Danger banners, creating extra noise and confusion for users and administrators.
Resolution Options
To address this issue, an administrator can take one of the following actions:
Trust the sender in INKY: Click Policy Actions and select an option to add Carefeed as a trusted third-party sender.
Update the domain’s SPF record: Modify the services.com SPF record to include mg.carefeed.com as an authorized sender.
Either option prevents legitimate internal emails sent through this service from being flagged as spoofed going forward.
Internal Name Match
Internal Name Match
Internal Name Match indicates INKY detected an email from an external sender whose display name matches the first and last name of an internal employee.
Example Scenario
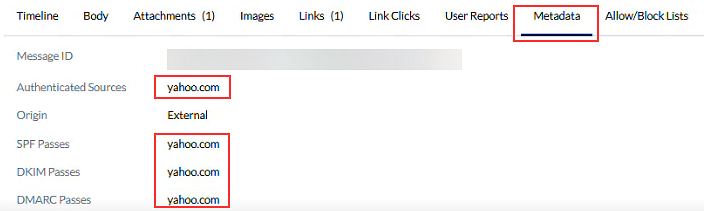
Zack Ro sends an email from his yahoo.com account to his services.com account.
Even though the email is properly authenticated, the sender’s display name exactly matches the name of an internal employee in the organization’s directory. Because this pattern can indicate impersonation, INKY displays a Caution banner to alert users to the potential risk.

If you check the Metadata tab, you’ll see that the email passed all standard authentication checks:
Authenticated Sources
SPF Passes
DKIM Passes
DMARC Passes
Impact
Internal name match warnings can add up quickly, especially if employees use personal email accounts. This can lead to a lot of Caution banners and make it harder to focus on real threats.
Resolution Options
To address this issue, an administrator can take one of the following actions:
Allow Zack to send emails from his personal email account to his work account:
Click Allow List Actions and select a Do not warn/include…option.
Enforce your policy: If your organization doesn’t allow employees to use personal email accounts for work, make sure that policy is clearly communicated to users.
Spoofed VIP
Spoofed VIP
Spoofed VIP means INKY detected an email from outside your organization where the sender’s name matches someone on your VIP list, but the email was sent from an address that isn’t on that list.
INKY treats this as high risk and flags any VIP name that appears from an unrecognized email address.
Example Scenario
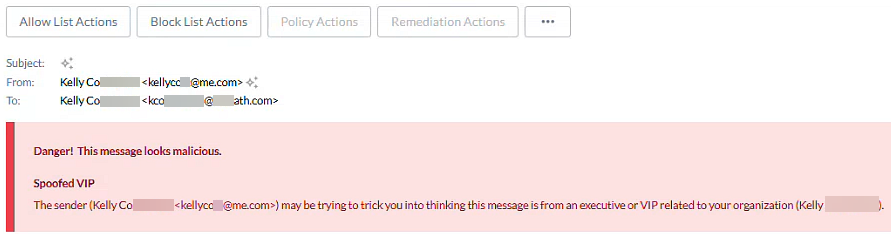
In this example, Kelly Co sends an email from her me.com account to her ath.com work email.
Because Kelly is on the VIP list but the email came from an address that isn’t associated with her, INKY shows a Danger banner. This warns recipients that the message could be an attempt to impersonate an executive or high‑value target. The email passed all standard authentication checks.
Impact
If all of a VIP’s legitimate email addresses aren’t included in the VIP list, you may see a lot of Danger banners for emails that are actually safe. This can create extra work for administrators and unnecessary concern for users.
Resolution Options
To address this issue, you can take one of the following actions:
Allow Kelly to send emails from her personal email account to her work account:
Click Allow List Actions and select one or more of the Never warn…or Do not include/warn…options.
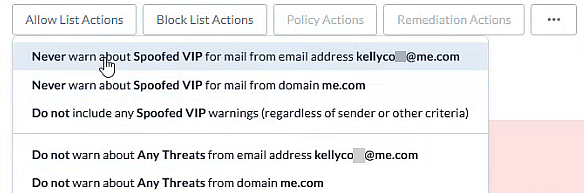
If Kelly regularly uses her personal email address to send emails to her work account, add the email address to the VIP list.
For instructions, see VIP Spoofing Protection.
How to…
This section includes the detailed steps for monitoring emails while INKY is operating in Journal mode.
Filter the email list
Filter the email list
Select Analysis > Observations.
Click the filter icon.
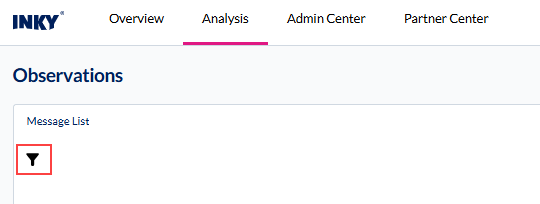
If you want to review emails for a specific team(s), in the Widget Filter Editor:
a. From the General menu, select Organization/Team.
b. In the Matches pane, click the organization/team. The organization/team is listed in the Selected pane.
c. Click Apply.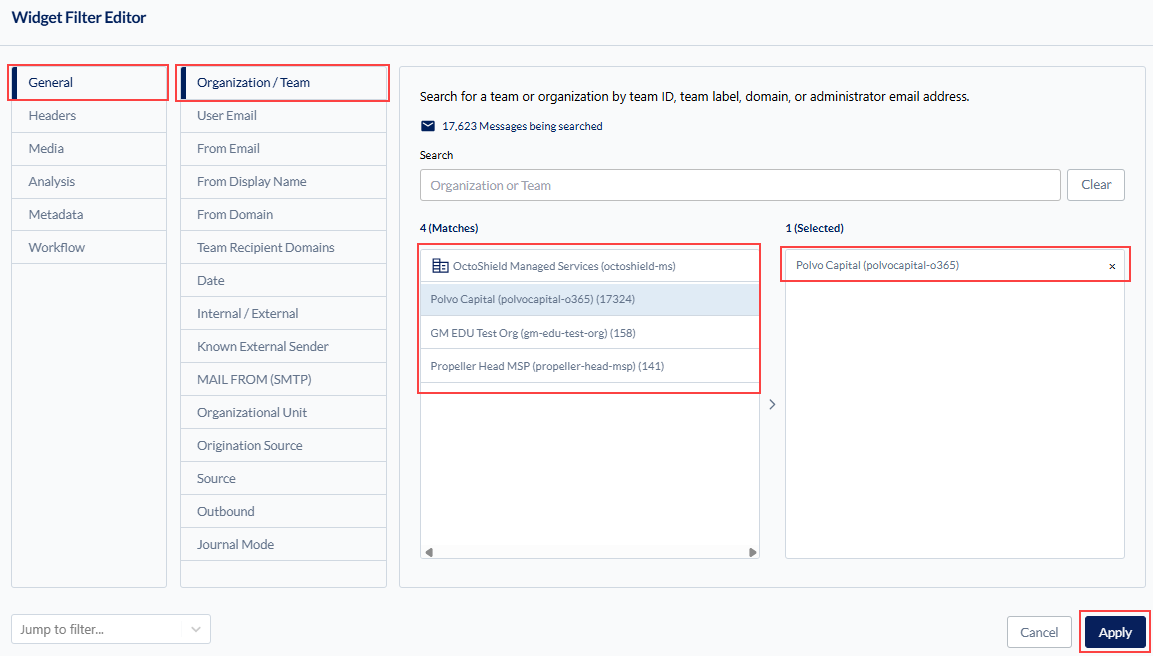
d. Click the filter icon.In the filter category pane, select Analysis. The analysis filters are listed.
Click the Threat Categories filter. The threat categories for which INKY has found messages are listed along with the number of emails included in each category.
Click the name of the desired threat category. The category is listed in the Selected pane.
If desired, select another category. The category is listed in the Selected pane.
Note: You may want to limit the number of categories you select to keep the number of emails listed more manageable.Click Apply. The Message List displays the emails for the selected category.
Review a specific email
Review a specific email
Now that you have filtered the emails to the desired threat category, you can analyze individual emails.
In the Message List table, review the Threat column:
- Red dot: Indicates a potentially dangerous email.
- Yellow dot: Indicates a potentially suspicious email.
- Grey dot: Indicates nothing suspicious or dangerous was found with the email.
Review the From, To, Subject, and Date fields. Consider this information along with the Threat level and click the desired email.
The email opens on its own tab in the Details panel. Click the Metadata tab and review the applicable information.
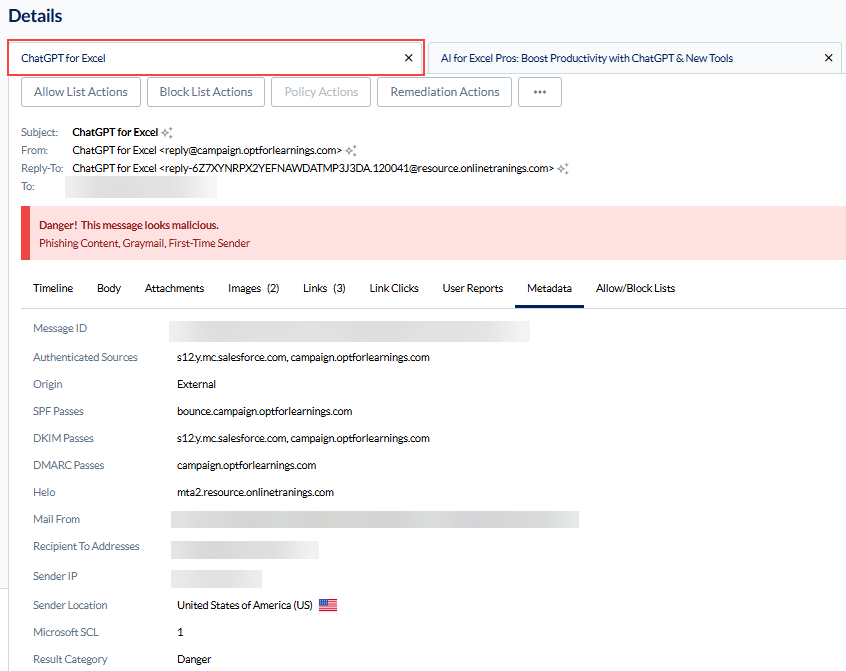
Act on an email
Act on an email
After reviewing an email, you are ready to act on it.
At the top of the email, click one of the action buttons.
Select one of the criteria options.
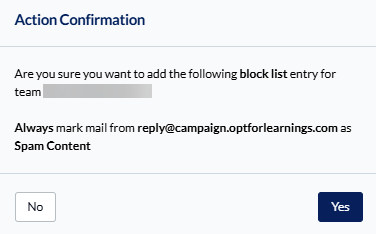
In the Action Confirmation dialog box, click Yes to complete the action or No to cancel.
In the Details section, click the close icon to close the email.
Still need help? Ask the team