Profiles & Deployment Strategies
Learn how to create targeted signatures for different teams and control how they're deployed.
Written By Matt Sywulak
Last updated 9 months ago
Understanding Profiles
Profiles let you create different signatures for different groups of users. For example:
Sales Team: Include CRM link and sales phone number
Support Team: Include support hours and ticketing system link
Executives: Include executive title and LinkedIn profile
Regional Offices: Include office-specific address and phone
How Profiles Work
Profile Assignment Rules
A user can be associated with a single profile at any given time. When a user meets the criteria for multiple profiles, the system uses a two-tier matching system:
Tier 1 - Assignment Type (Higher Priority):
Email address matches are always preferred over group matches
Even if a group match has higher rule priority
Tier 2 - Rule Order (When assignment type is the same):
Profiles are organized in priority order from top to bottom
The highest-priority matching profile is assigned
Matching Precedence Example
Profile A: Marketing Group
Profile B: Sales Group
Profile C: john.doe@company.com (email address)

User: john.doe@company.com (member of Sales group)

Result: Profile C is assigned

Why? Email address match (Profile C) takes precedence over
group match (Profile B), regardless of rule order.
Key Principle: Assignment matching always prefers email addresses over group membership, ensuring the most specific and relevant profile is assigned.
Profile Matching Criteria
Profiles match users based on:
Email Addresses: Specific individuals (highest priority)
Tenant Groups: Microsoft 365 or Google Workspace groups (synchronized automatically)
Both: Combine email and group criteria in same profile
Creating Your First Profile
Step 1: Open Profile Manager
Look for the Profile selector (top-right of the page)
Click the dropdown arrow
Select "Manage Profiles" at the bottom
What you'll see: A table displaying all profiles in priority order from top to bottom.
Note: Hover over a profile to see the cog (⚙️) icon for editing or the up/down arrows for reordering
Step 2: Create New Profile
Click "New Profile" (bottom-right)
Fill in profile details:
Label: Sales TeamAdd Email Criteria (optional):
Click "Add Email"
Type email address: sales-manager@acme.com
Repeat for additional emails
Add Group Criteria (recommended):
Click "Add Group"
Search for your Microsoft 365 or Google Workspace group: "Sales"
Select the group from results
Repeat for additional groups
No groups showing? Groups are synchronized from your email tenant. If you don't see any groups, Domain and Directory may not be enabled. Contact your administrator or see API Access documentation for setup instructions.
Click Save
Step 3: Configure Profile Signature
In the profile dropdown, select "Sales Team"
Notice the badge showing "Profile: Sales Team" appears
Notice the alert: "Note: You are currently configuring a signature profile (New Profile) that affects only some users."
Make your changes:
Add sales-specific CTA
Include different contact info
Adjust styling if needed
Click Save
Important: Profile settings override the default. Only change settings that should differ from the default.
Profile Override System
Understanding Overrides
Profiles can be completely independent from the default policy, with their own unique settings, or they can inherit the default settings and have specific ones tailored as needed. This provides the right balance between uniformity and customization for your email signatures.
When a profile (other than Default) is selected, the UI shows a status icon next to every setting to indicate whether that setting is inherited from the team or overridden in the profile.
Override Status Icons
How it works:
Select a profile from the dropdown
Status icons appear next to each setting
Click the icon to toggle between inherited/overridden state
Make changes to overridden settings
Save your configuration
Override Best Practices
Override sparingly: Only override settings that need to differ from the default.
Common Profile Overrides:
✅ Company CTA (different call-to-action per department)
✅ Company Location (regional office addresses)
✅ Social Media Handles (department-specific accounts)
✅ Layout (different field arrangements for different roles)
✅ Images (department-specific logos or banners)
Usually Keep Inherited:
❌ Font Family (maintain visual consistency)
❌ Base Text Color (unless brand requirements differ)
❌ Company Name (unless truly different entities)
Advanced Profile Strategies
Strategy 1: Department-Based Profiles
Create profiles for each department:
Profiles:
1. Sales (Group: sales@acme.com)
   Override: CTA → "Schedule a Demo"

2. Support (Group: support@acme.com)
   Override: CTA → "Get Help", Support Hours

3. Engineering (Group: engineering@acme.com)
   Override: GitHub profile, minimal layout

4. Executive (Emails: ceo@, cfo@, cto@)
   Override: Executive titles, no phone
Strategy 2: Regional Offices
Different locations need different contact info:
Profiles:
1. West Coast Office
   Override: Location, Office Phone, PST timezone

2. East Coast Office
   Override: Location, Office Phone, EST timezone

3. International (EMEA)
   Override: Location, International format phone
Strategy 3: Role-Based Signatures
Tailor signatures by job function:
Profiles:
1. Customer-Facing (Sales, Support, Success)
   Override: Detailed layout, social media, CTA

2. Internal-Only (Engineering, Ops)
   Override: Minimal layout, no marketing

3. Leadership
   Override: Executive styling, LinkedIn only
Deployment Modes
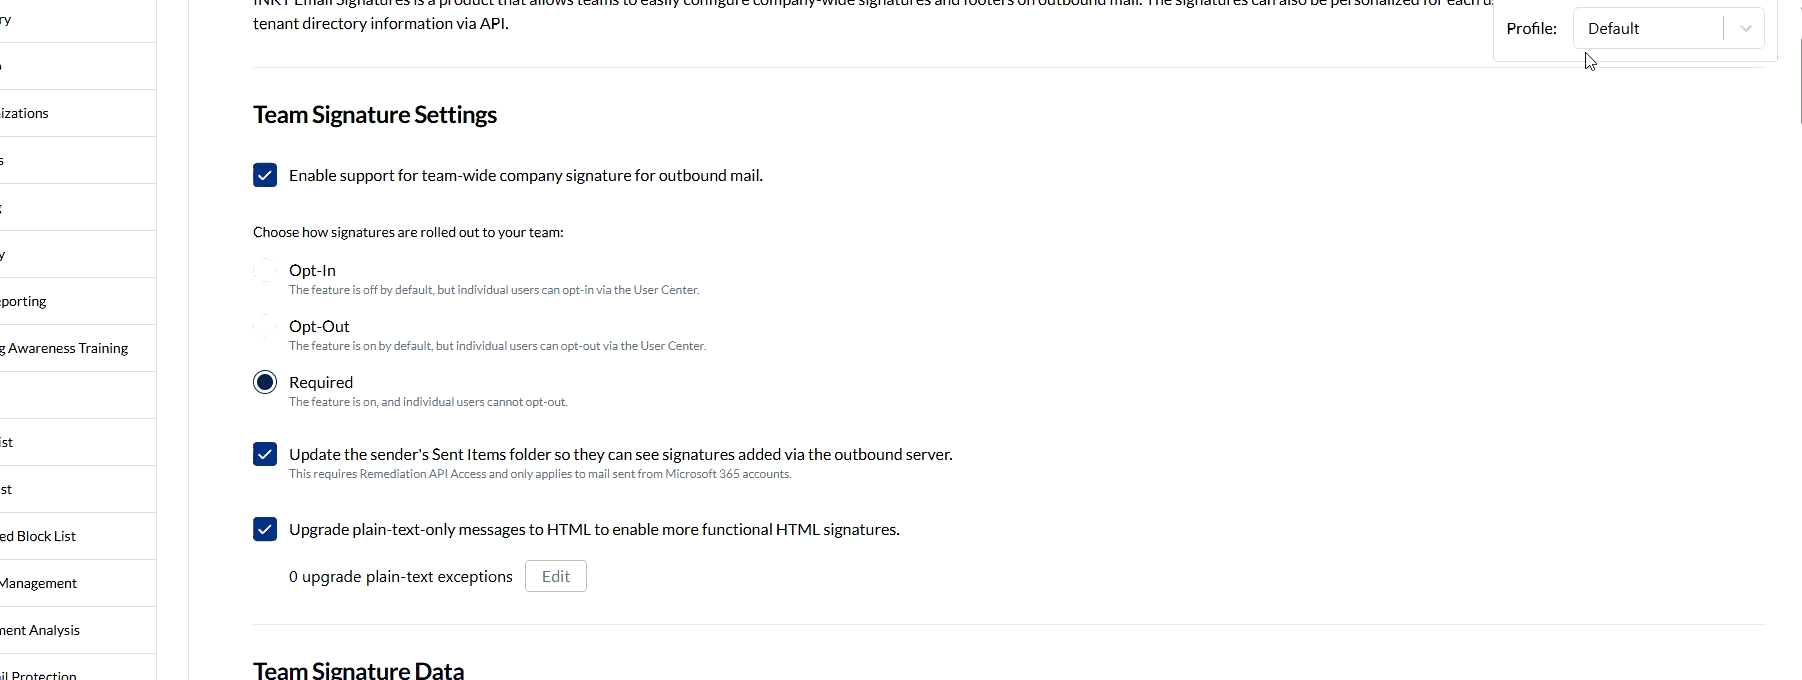
Required (Recommended for Most Organizations)
How it works:
Signatures are automatically added to all outgoing emails
Users cannot disable signatures
Immediate, consistent deployment
Best for:
Organizations requiring brand compliance
Legal/regulatory requirements
Marketing consistency
User Experience:
✅ Signature appears automatically
ℹ️ No user action required
Stats Shown:
Required for all users
• 247 active users
Opt-In (User Chooses to Enable)
How it works:
Users are prompted to enable signatures
Signatures only appear after user opts in
User controls when to start using signatures
Best for:
Gradual rollouts
Testing with pilot groups
Organizations preferring user choice
User Experience:
📧 Prompt: "Enable company email signature?"
👤 User clicks "Enable"
✅ Signature appears on future emails
Stats Shown:
Opt-in (users choose to enable)
• 143 users opted in
Opt-Out (Enabled by Default)
How it works:
Signatures are enabled for all users
Users can disable if preferred
Balances automatic deployment with user control
Best for:
Soft rollouts with flexibility
Organizations transitioning to required mode
Giving users initial control
User Experience:
✅ Signature appears automatically
👤 User can click "Disable signature" in settings
❌ Signature removed
Stats Shown:
Opt-out (enabled by default)
• 12 users opted out
Managing Multiple Profiles
Reordering Profiles
Profiles are organized in priority order from top to bottom in the Manage Profiles table. This order matters when multiple profiles could match a user based on the same criteria type (email or group).
To change priority:
Open Manage Profiles
Hover over a profile row - up/down arrows appear
Click ↑ (Move Up) or ↓ (Move Down)
Profile priority changes immediately
Click Done when finished
Remember: Email address matches always take precedence over group matches, regardless of profile order. Priority order only matters when comparing the same type of match.
Example Order:
1. Executive Team (email addresses) ← Highest priority for email matches
2. West Coast Office (group)        ← Highest priority for group matches
3. East Coast Office (group)
4. Sales Team (group)
5. Support Team (group)
(Default applies if no profile matches)
Editing Profiles
Open Manage Profiles
Hover over a profile row
Click the ⚙️ (cog) icon that appears
Modify profile details:
Label: Display name for the profile
Email Addresses: Add or remove specific email addresses
Groups: Add or remove Microsoft 365/Google Workspace groups
Click Save
Tip: Groups are synchronized directly from your email tenant, ensuring your organization's structure is accurately represented.
Deleting Profiles
Open Manage Profiles
Click on a profile row
Click Delete Profile (bottom-left)
Confirm deletion
Warning: Deleting a profile removes all its overrides. Users will fall back to the next matching profile or default.
Monitoring Profile Usage
Viewing Active Profile
When editing, the current profile is shown:
Badge (top-right): "Profile: Sales Team"
Alert (below header): "You are editing the Sales Team profile signature"
Profile Statistics
The profile selector shows user counts:
Profile: Sales Team
📧 12 emails
👥 2 groups
Switching Between Profiles
Click the Profile dropdown (top-right)
Select a different profile or "Default"
Page reloads with that profile's configuration
Tip: Always verify which profile you're editing before making changes!
Deployment Workflows
Workflow 1: Pilot Group Rollout
Week 1: Create "Pilot" profile for 10-20 test users
Set deployment to Opt-In
Gather feedback
Week 2: Adjust based on feedback
Refine layout and content
Test on different devices
Week 3: Expand to departments
Create department profiles
Switch to Required mode
Week 4: Full rollout
Remove pilot profile
Monitor adoption
Workflow 2: Department-by-Department
Phase 1: Sales team
Create Sales profile
Set to Required
Monitor for 1 week
Phase 2: Support team
Create Support profile
Apply lessons from Sales
Deploy
Phase 3: All other departments
Create remaining profiles
Full deployment
Workflow 3: Regional Rollout
Headquarters First: Deploy to main office
Regional Offices: Create location-based profiles
International: Adjust for local requirements
Unified: Merge to single default when stable
Troubleshooting Profiles
User Getting Wrong Signature
Check:
Assignment precedence: Email matches always beat group matches
Profile order: Only matters for same-type matches (email vs email, or group vs group)
Email/group criteria: Verify user meets the expected criteria
Tenant sync: Ensure group membership is updated (Microsoft 365/Google Workspace)
Fix:
Review Profile Assignment Rules to understand precedence
Check if user has an email match in a different profile (takes precedence)
Reorder profiles if comparing same criteria types
Update criteria to be more specific
Wait for directory sync (may take up to 1 hour)
Override Not Working
Check:
Status icon: Globe/Building = inherited, Person = overridden
Profile selected: Check badge shows correct profile name
Changes saved: Must click Save after creating override
Fix:
Click the status icon to add override (lock it in)
Verify correct profile is selected in dropdown
Click Save after making changes
Refresh page to confirm override is active
Profile Deleted by Accident
Unfortunately: Profile deletions cannot be undone
Workaround:
Create new profile with same name
Re-add email/group criteria
Reconfigure overrides
Prevention: Export profile settings by taking screenshots before major changes