Getting started with INKY
Written By Eric Heller
Last updated 5 months ago
What is INKY?
INKY is Kaseya’s best-in-class email security solution, designed to protect your organization from phishing and email threats.
INKY uses multiple AI detection methods (computer vision, GenAI, behavioral analysis, link analysis, sender authentication) to catch sophisticated email threats. Transparent warning banners explain threats in plain language, building user trust and awareness.
For more information, see the article Understanding INKY Basics.
Organizations and teams
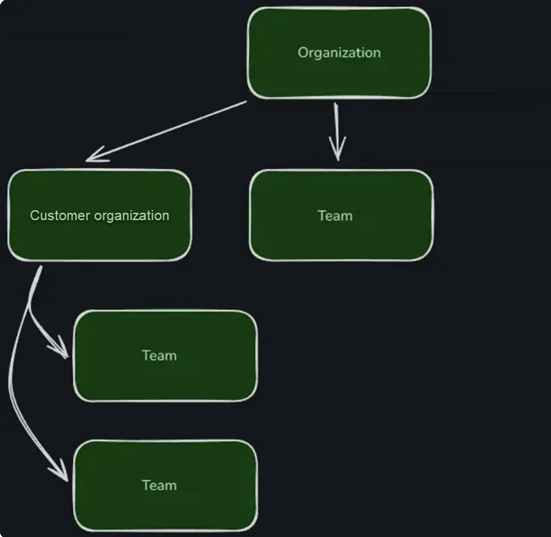
Organizations are INKY's highest-level entity for grouping teams and managing hierarchy. Organizations provide a structure for organizing multiple teams, assigning administrators, and controlling settings across the entire account.
In INKY, teams typically represent small to medium-sized businesses (SMBs). Teams can be nested within organizations to maintain hierarchy and streamline management. An organization can have multiple teams, each with its own set of administrators and settings.
An organization automatically includes the following entities:
Root organization: INKY's highest-level entity, the MSP. The root organization can include many customer organizations. Root organizations are represented with a building icon.

Root organization’s team - This is the MSP’s/MME’s own team for which they can deploy and become familiar with INKY. Teams are represented with a people icon.

Customer organization - These sub-organizations are the customers of the root organization. Customer organizations can have many teams and are represented with a people icon.

Onboarding
IMPORTANT: Only users with the Super Admin account can perform Onboarding tasks.
This Onboarding section guides you through the essential tasks required to ensure a successful onboarding experience. It is recommended you perform the tasks in each section in the order they are presented.
IMPORTANT: A section may refer you to a separate article with instructions for completing the task. After you complete the task, be sure to return to this “Getting started with INKY” article and move to the next section to continue onboarding.
1. Installing INKY for your organization’s own team
Installing INKY for your organization’s own team is a great way to become familiar with INKY’s features and deployment strategies.
For more information, see the article Installing INKY for your own organization’s team.
2. Installing INKY for a customer organization
Generating a license and installing INKY in the client's email platform are key steps when installing INKY for a customer organization.
For more information, see the article Installing INKY for a customer organization.
3. Configuring essential features
After installing INKY for your own organization or a team, you should configure several essential features to ensure optimal protection and accurate threat detection.
Understanding inheritance
To configure features effectively, it is important to understand how inheritance works in INKY. Features and policies configured at the root organization level are automatically inherited by all of the organization’s child teams. When a feature is configured at the team level, that setting overrides the inherited configuration for that specific team.
For more information about inheritance, see the article Organization Settings and Inheritance.
Admin Center
Essential features are configured from the Admin Center.

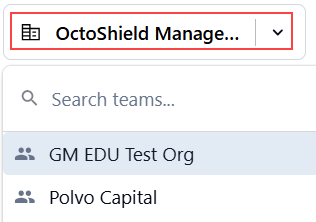
From the Team Selector drop-down, select the team for which you want to configure features. It is recommended that you configure feature settings at the partner level (building icon) first and then adjust them as needed at the team level (people icon).
Analysis Settings
The Analysis Settings page contains key features that control how INKY analyzes and detects threats in your email environment. To access this page, click Analysis in the left navigation menu.
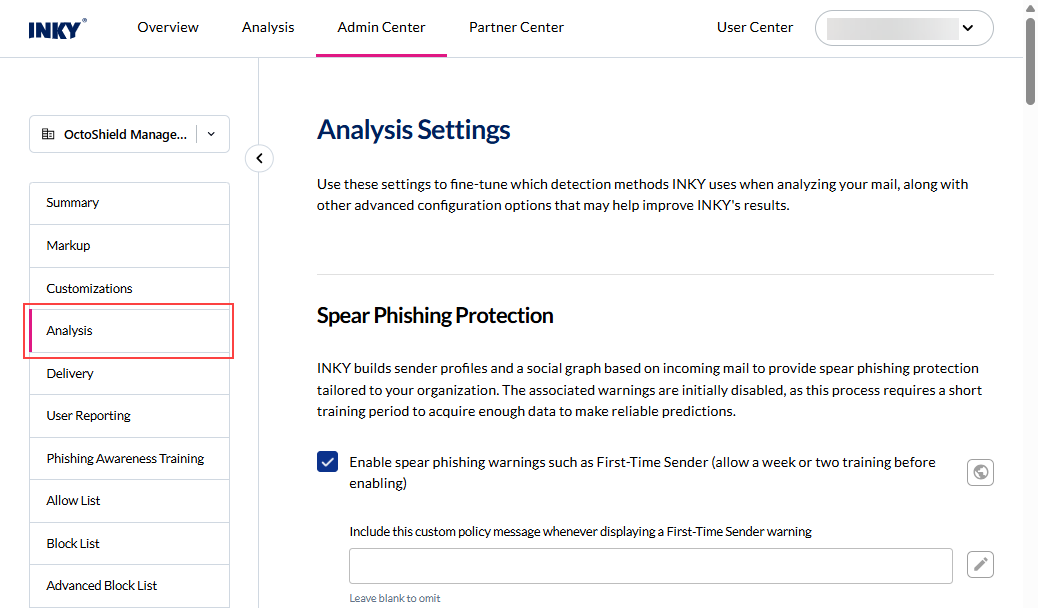
Note: Features that support enable/disable functionality are listed with their default status.
Spear Phishing Protection: (Enabled)
Spear Phishing Protection: (Enabled)
The Spear Phishing Protection feature enables INKY to build your organization’s social graph. By analyzing email traffic, INKY learns normal communication patterns—mapping who typically communicates with whom. This insight helps reduce unnecessary security banners on messages exchanged between trusted, established relationships.
Internal Name Spoofing Protection: (Enabled)
Internal Name Spoofing Protection: (Enabled)
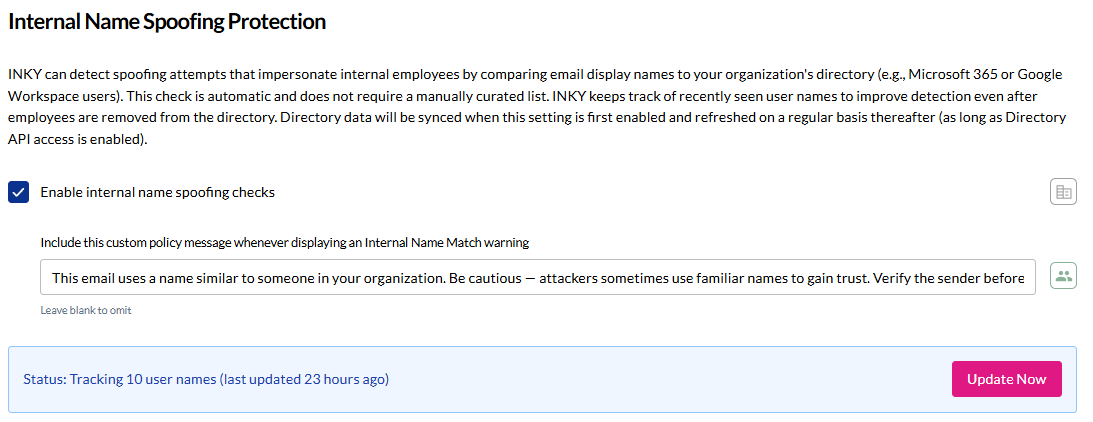
Internal Name Spoofing Protection detects attempts by external senders to impersonate employees within your organization.
INKY compares the display name of incoming emails against your organization’s directory. If an external sender uses a display name that matches the first name and last name of an employee in the directory, INKY displays a warning banner. This does not automatically indicate a malicious message, but it helps users identify potential impersonation attempts.
The directory synchronizes automatically every 24 hours. To ensure the most current user list is used, click Update Now.
For more information, see the article Internal name spoofing protection.
VIP Spoofing Protection: (Disabled)
VIP Spoofing Protection: (Disabled)
VIP Spoofing Protection allows you to configure a list of high-risk users, such as executives, board members, or frequently spoofed employees, whose impersonation represents critical business risk.
When enabled, emails sent from external sources that do not match the first name, last name, and email address of a VIP are escalated to Danger level and display a danger banner.
It is recommended that you enable the following options at the partner level so they are inherited by your teams:
Enable VIP spoofing checks: INKY verifies that the sender’s email address matches an entry in the VIP list.
Require matching VIP email addresses to be authenticated: This prevents legitimate VIP addresses from being spoofed.
IMPORTANT: A VIP list can be configured only at the team level.
See the article VIP spoofing protection.
Known External Senders
Known External Senders
Use Known External Senders to define domains and email addresses of organizations your organization regularly does business with. Authenticated messages from these senders are labeled as Known External in INKY’s banners.
Note: Authenticated external messages from a team domain are automatically treated as Known External and do not need to be added.
For more information, see the article Known external senders.
Upstream Provider
Upstream Provider
If your organization uses a third-party email provider, select the provider to ensure INKY can correctly process and analyze the email path.
See the article Upstream provider.
Markup Settings
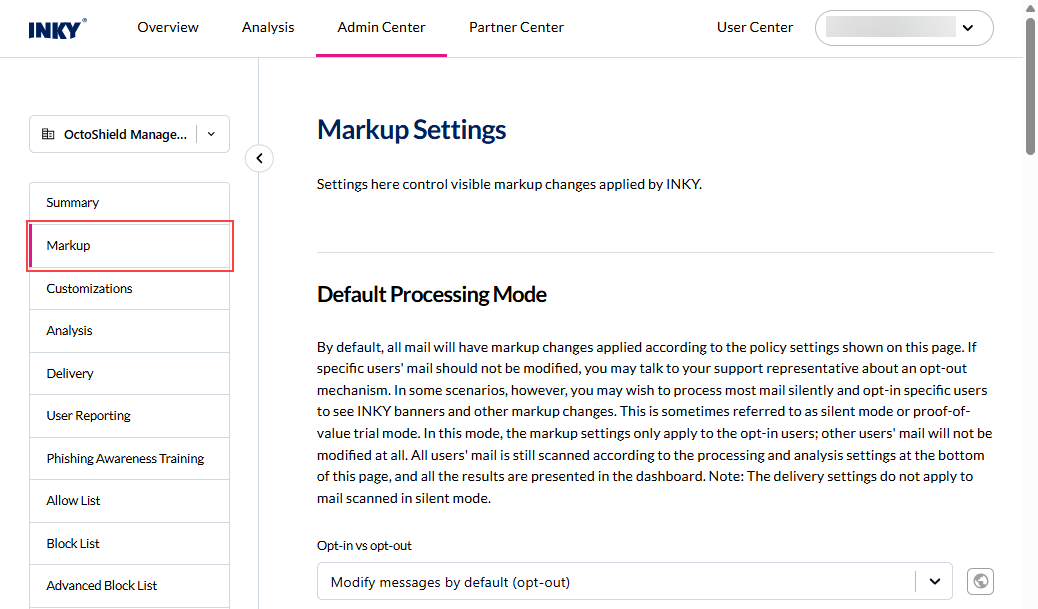
The Markup Settings page includes key features that control the visible markup changes applied by INKY to email messages. To access this page, click Markup in the left navigation menu.
Link Rewriting: (Enabled)
Link Rewriting: (Enabled)
INKY checks each link in an email to determine whether it is malicious. Non-malicious links are rewritten before they are sent to the recipient. If the user clicks a rewritten link, the request is routed to an INKY server for analysis.
IMPORTANT: Using more than one link-rewriting service can result in unexpected behavior. If another link-rewriting service is enabled in your environment, it is strongly recommended that you disable either that service or INKY link rewriting.
See the article Link rewriting.
Banner Configuration
Banner Configuration
When INKY analyzes an email, it inserts a color-coded banner at the top of the message based on the detected threat category. These banners are visible in the user’s inbox and provide a clear explanation of what INKY identified.
To customize banner behavior and appearance, see the help section Email Assistant (INKY Banner).
Modifications for special message types
Modifications for special message types
INKY allows you to control how security features and markup are applied to certain types of messages. The table describes the available options and the recommended configurations.
Allow list and Block list
Allow list and Block list
Allow List: Configure an allow list to add trusted business partners and frequent senders to reduce false positives. Configuration is available at the organization and team levels.
To configure, see Allow list overview.Block List: Configure a block list to permanently block known malicious senders or domains. Configuration is available at the organization and team levels.
To configure, see Block list overview.
4. Understanding group management
Organizations can assign users to one of three INKY user groups. While all three groups may be used, each user can belong to only one group. The assigned group determines how INKY analyzes and processes email for those users.
Include Group: Users in the Include Group are fully protected by INKY email security.
Exclude Group: Users in the Exclude Group are not processed by INKY. INKY does not provide email security for these users.
Journal Group: Users in the Journal Group are protected by INKY email security. However, INKY does not provide user‑facing visibility. Warning banners are not added to emails and emails are not blocked or quarantined.
When users are assigned to the Journal Group, INKY operates in Journal mode for those users. In Journal mode, INKY receives and analyzes all email. The Dashboard displays what would have been detected, allowing administrators to review threats INKY identifies in the environment and build allow lists for legitimate senders.
Recommended group management approach
It is highly recommended that you begin managing your users by adding a small number of them to the Journal Group only.
IMPORTANT: At this stage of onboarding, do not add any users to the Include Group.
For more information about user groups and how to assign users to a group, see the article Group management.
5. Planning your deployment strategy
INKY uses a two-phase deployment approach that minimizes user disruption and false positives:
Phase 1: Journal Mode (3-7 days): During Journal Mode, INKY provides passive email monitoring with no user visibility. INKY's social graphing begins building your organization's email network map. This reduces first-time sender alerts later.
During Journal mode, you monitor how INKY processes email for users in the Journal Group and adjust policies as needed.
Note: For detailed steps on monitoring emails while INKY is operating in Journal mode, including examples of how to review and act on specific emails, see Monitoring email while in Journal Mode.Phase 2: INKY-Users Group: After completing Journal Mode, you can add users to the Include Group to receive full inline INKY protection with banners. To ensure a smooth rollout and minimize user impact, it is recommended to add users gradually in batches.
For more information, see the article Deployment strategy.
6. Adding account users
Super Admins can add users who have access to and work within their INKY environment. There are multiple roles available, each with specific permissions. When adding a user, make sure to select the appropriate role based on the level of access required.
For more information, see the article Admin management.
Frequently asked questions
For answers to common INKY questions, see the article General Q&A.
Still need help? Ask the team