Import Teams from Graphus
Step-by-step guide for importing Graphus-protected teams into INKY using the bulk import wizard or single team import.
Written By Matt Sywulak
Last updated 10 days ago
The Graphus Import tool lets Kaseya partners import teams from Graphus to INKY protection. You can import teams one at a time or use the bulk import wizard to configure and import multiple teams at once.
Importing a team from Graphus DOES NOT mean they're installed or protected. You must finish the full Team Setup process after importing to be fully protected.
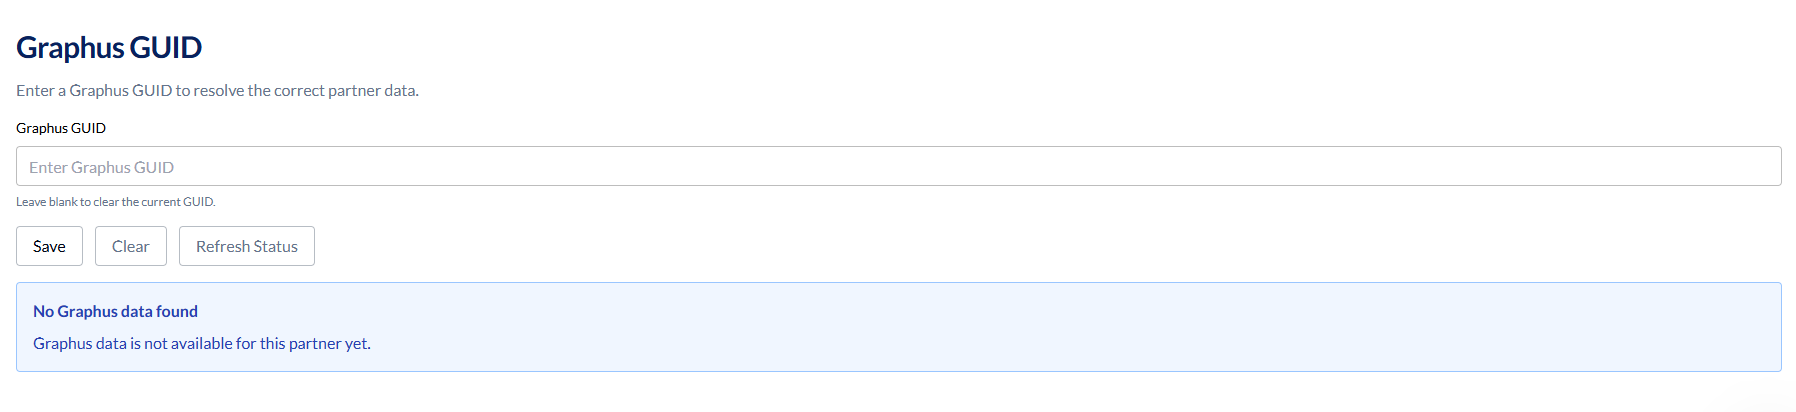
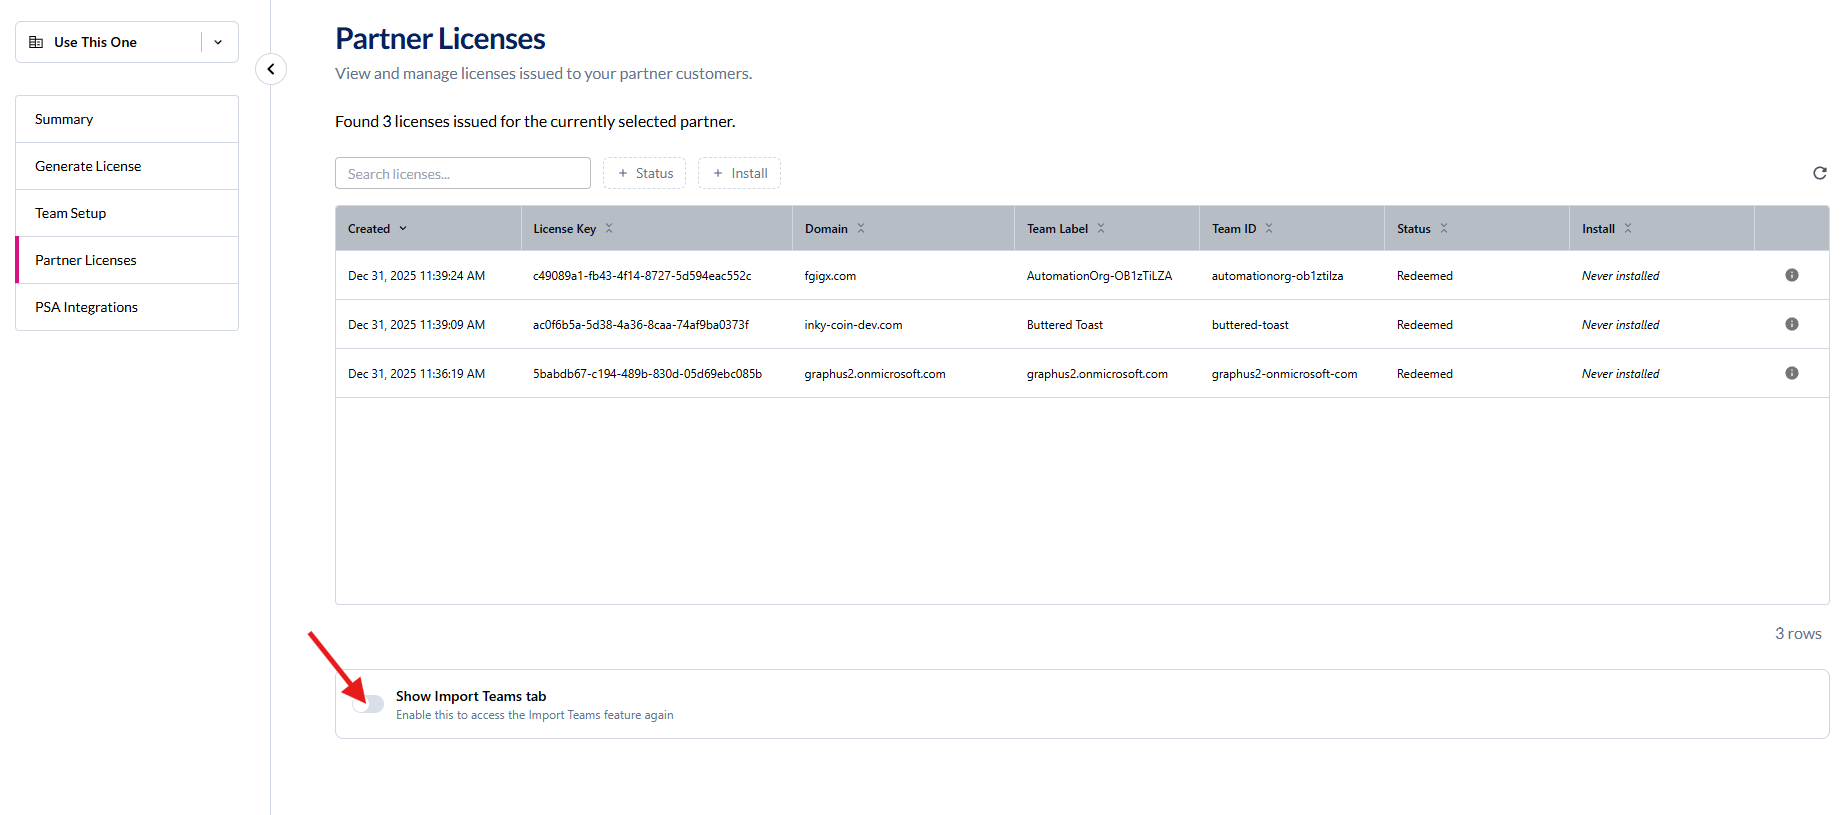
Don't see the Import Graphus Teams option?
The Graphus import tools only appear when your INKY and Graphus accounts are linked. If the connection wasn't automatically established, you'll see a Graphus GUID field in the Partner Center Licenses section instead. Enter your Graphus GUID there first, then return to access the import tools.
Accessing the Import Tool
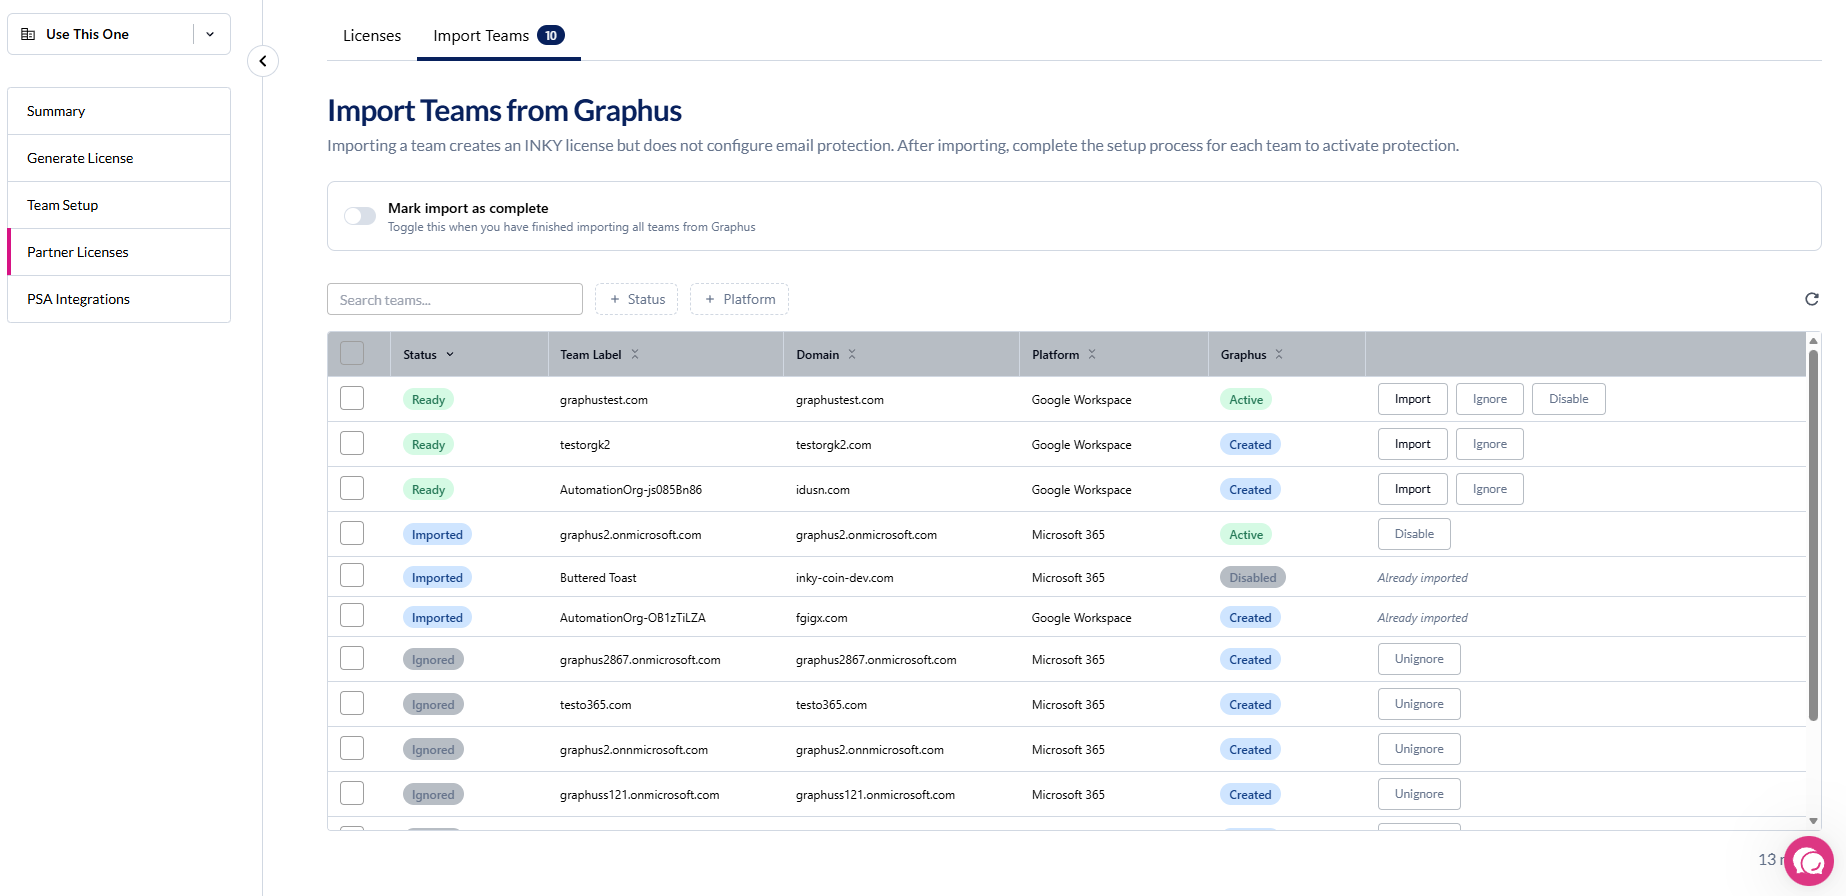
Navigate to Partner Center in the INKY dashboard. If you have Graphus teams available for import, you'll see an Import Graphus Teams CTA. Click the CTA or navigate directly to https://app.inkyphishfence.com/partner-center/licenses?tab=import to get started.

Understanding Team Status
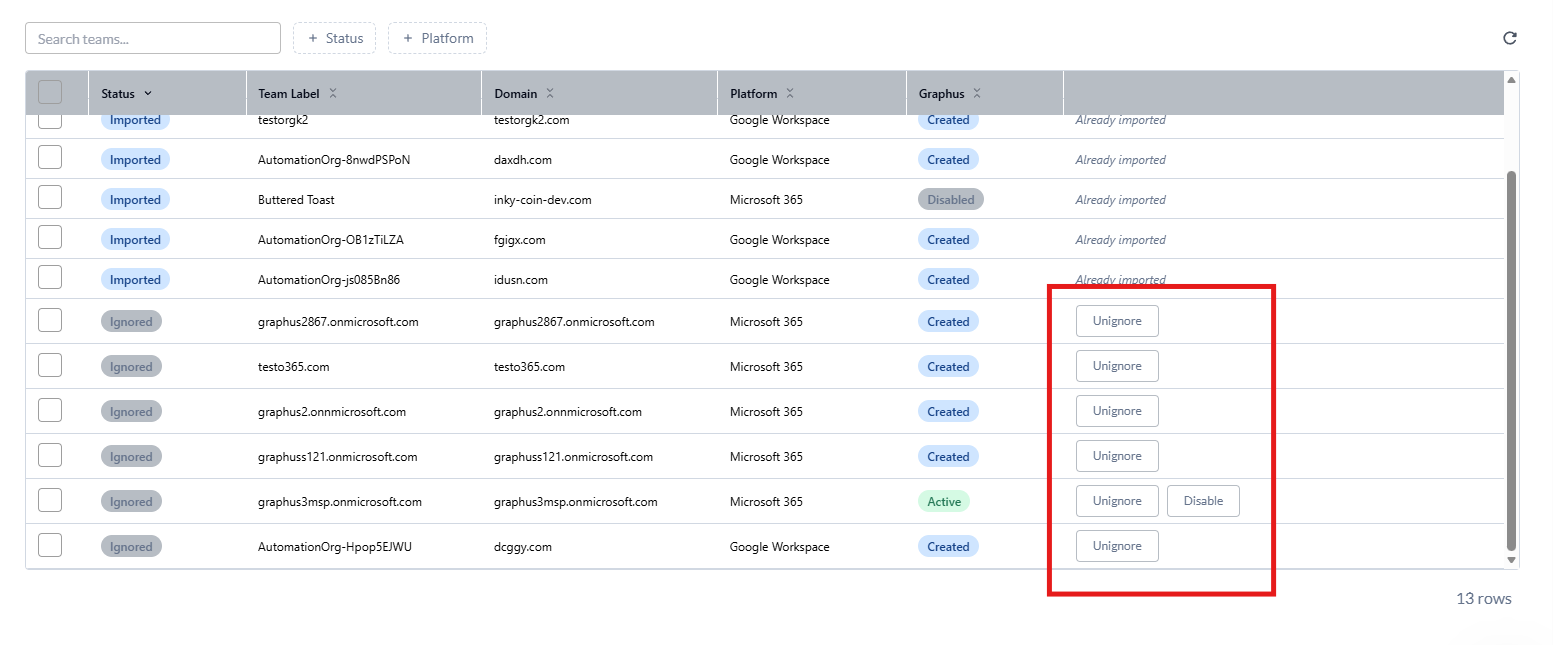
Each team in the import list shows one of these statuses:
Ready - Available to import into INKY
Imported - Already imported and configured in INKY
Conflict - Cannot be imported due to a configuration conflict
Ignored - Manually marked to skip (can be unignored later)
Teams also show their current Graphus Status: Active, Disabled, Created, or various activation states.
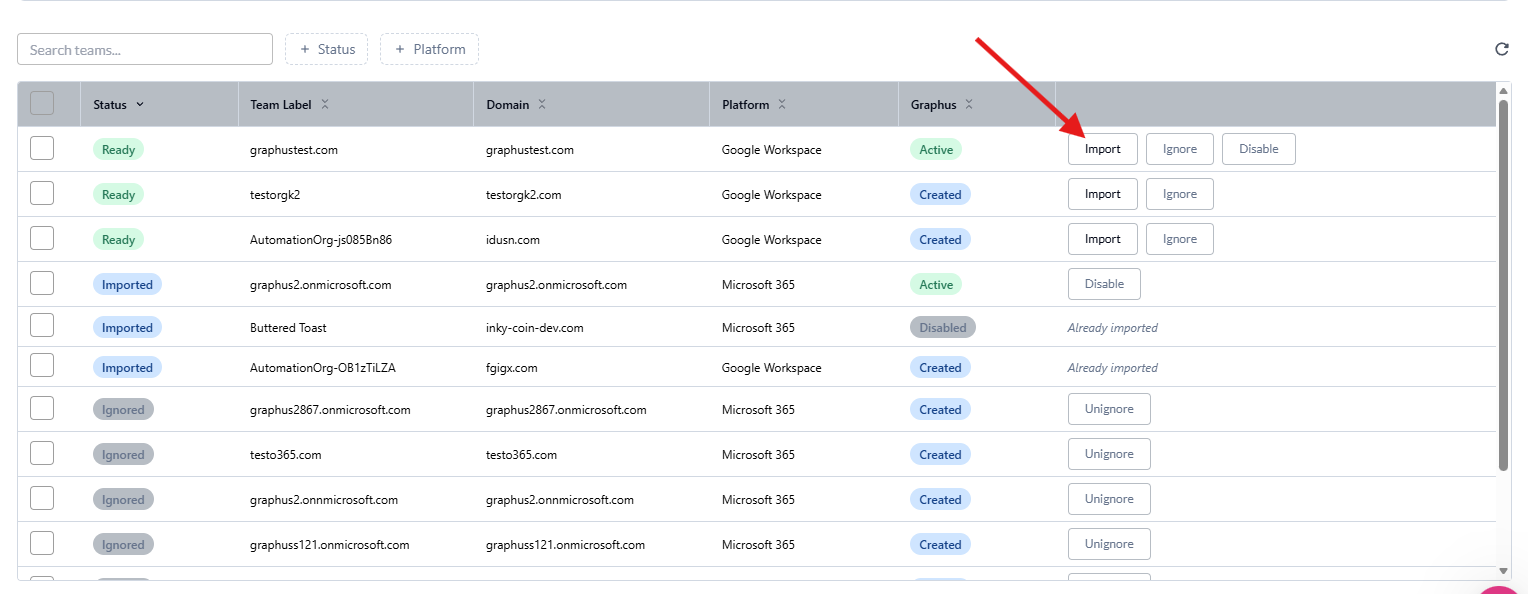
Single Team Import
To import one team at a time:
Click on a team row in the import list
The import modal opens and loads the team's details from Graphus
Review and edit the Team Label and Team ID if needed
Select a Tenant Admin from the dropdown (or enter a custom email)
Choose your INKY Products (at least one required)
Optionally assign roles to additional admins

Click Import Team
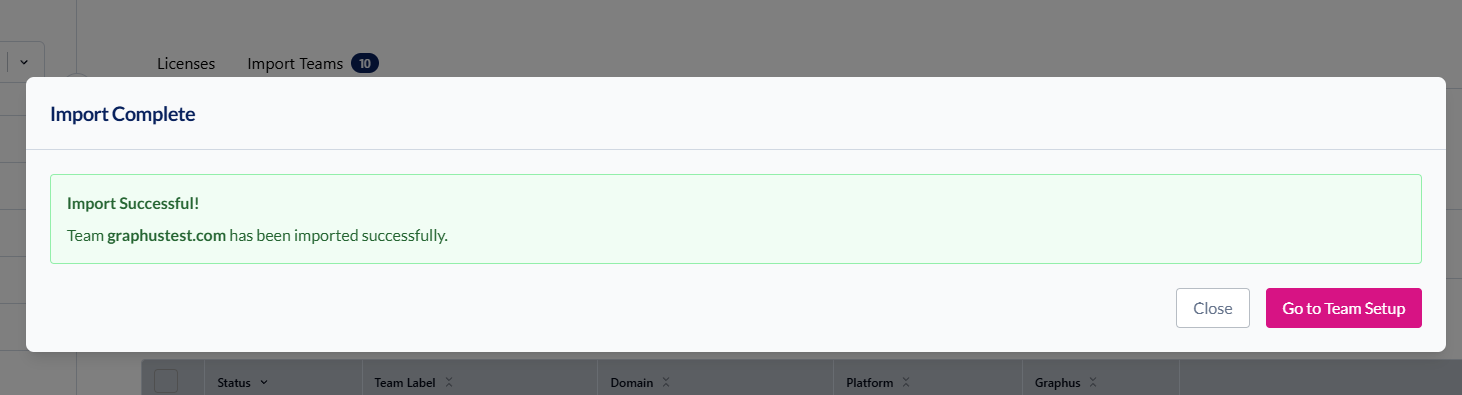
After a successful import, you'll see a confirmation with a link to continue setup in Team Setup.
Bulk Import Wizard
To import multiple teams with consistent configuration:
Select multiple teams using the checkboxes in the team list
Click Import X Teams in the toolbar
Follow the 5-step wizard

Step 1: Team Details
The wizard fetches details for all selected teams from Graphus. For each team, you can:
Edit the Team Label (display name in INKY)
Edit the Team ID (unique identifier, auto-generated from label)
The footer shows how many teams are ready. If any teams fail to load, you'll see an error count.
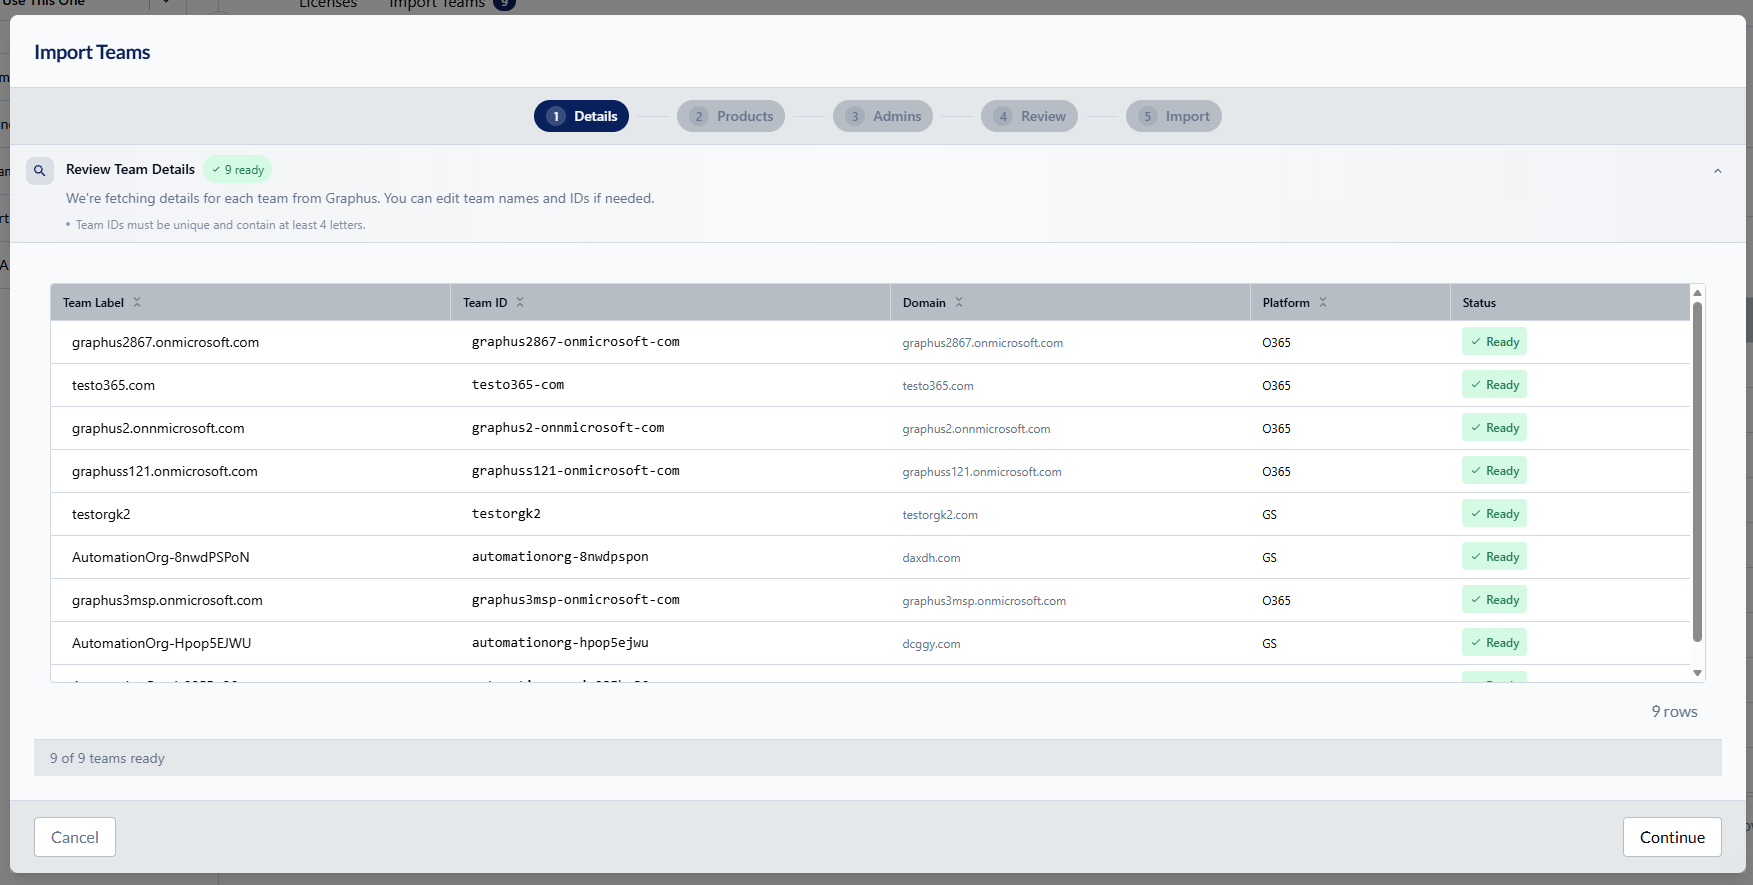
Team IDs must be at least 4 characters, using only lowercase letters, numbers, underscores, and hyphens.
Step 2: Products
Select which INKY products to activate for each team:
Products marked as Recommended are pre-selected
Use the Apply to All button to set the same products for all teams
At least one product must be selected per team
Tip: Select the products dropdown in the Product column to select a different product for individual teams.

Step 3: Admins
Configure admin access for each team:
IMPORTANT: Tenant Admins must be the global admin for the tenant you're importing, the admin you'd use to grant permission to the tenant during install.
Tenant Admin (required) - Select from the list of Graphus admins or enter a custom email. The tenant admin automatically receives super admin permissions.
Additional Admins - Optionally assign roles to other admins from Graphus:
Viewer - Read-only access
Analyst - Analysis and reporting
Policy Admin - Manage policies (default)
Super Admin - Full administrative access
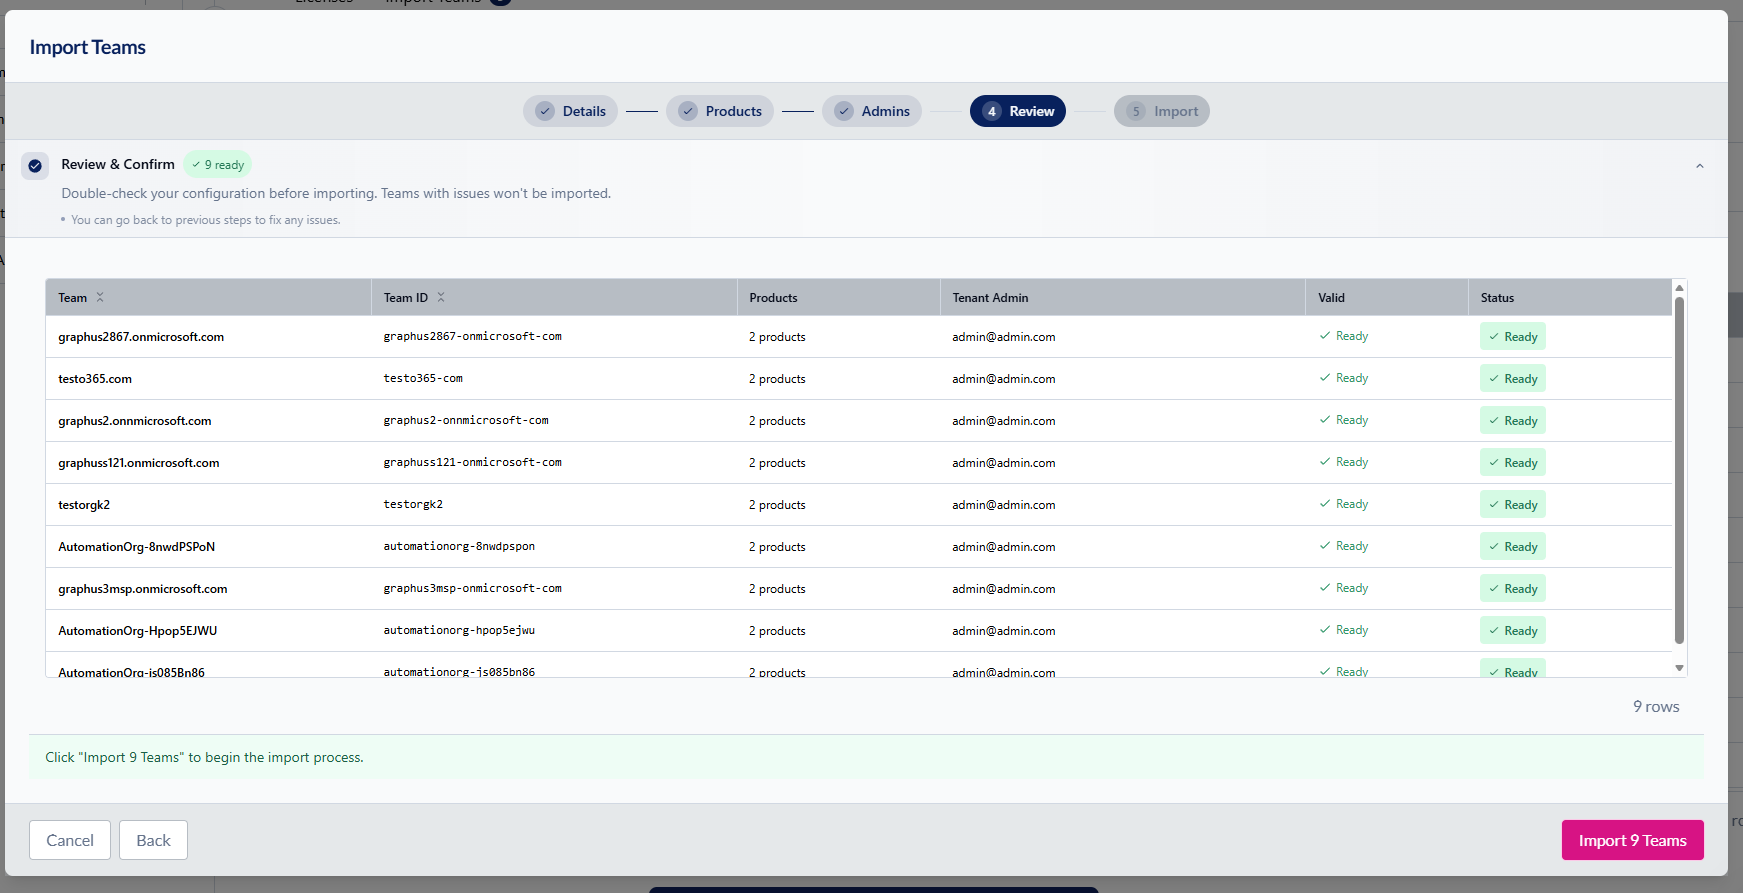
Step 4: Review
Review all team configurations before importing. This read-only summary shows:
Team details (label, ID, domain, platform)
Selected products
Admin assignments
Any validation issues that need to be fixed
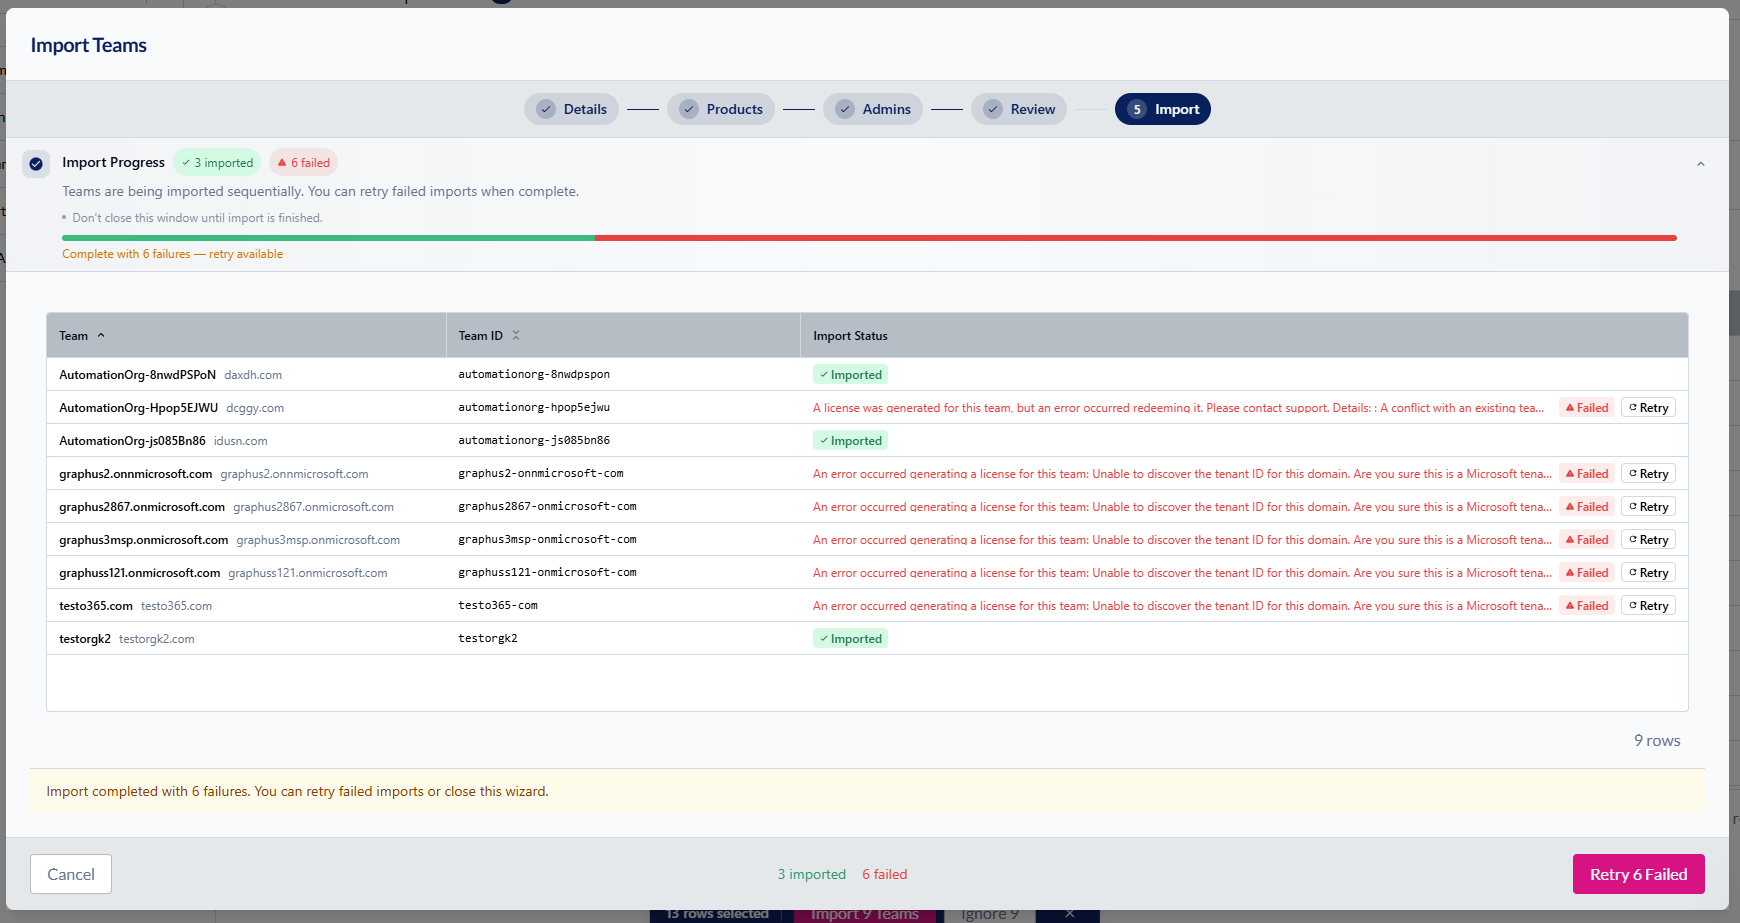
Step 5: Import
Click Import X Teams to begin. The wizard shows real-time progress for each team:
Spinning loader - Import in progress
Green checkmark - Successfully imported (shows license key)
Red X - Failed (shows error message)
If any imports fail, you can click Retry on individual teams without losing successful imports.
Managing Teams
Ignoring Teams
If you're not ready to import certain teams, you can ignore them temporarily:
Click the Ignore button on a team row, or select multiple teams and click Ignore X
Ignored teams remain visible but cannot be imported
To restore a team for import, click Unignore

Hiding the Import Tab
After you've imported all your teams, you can hide the Import Teams tab:
Toggle the Mark import as complete switch
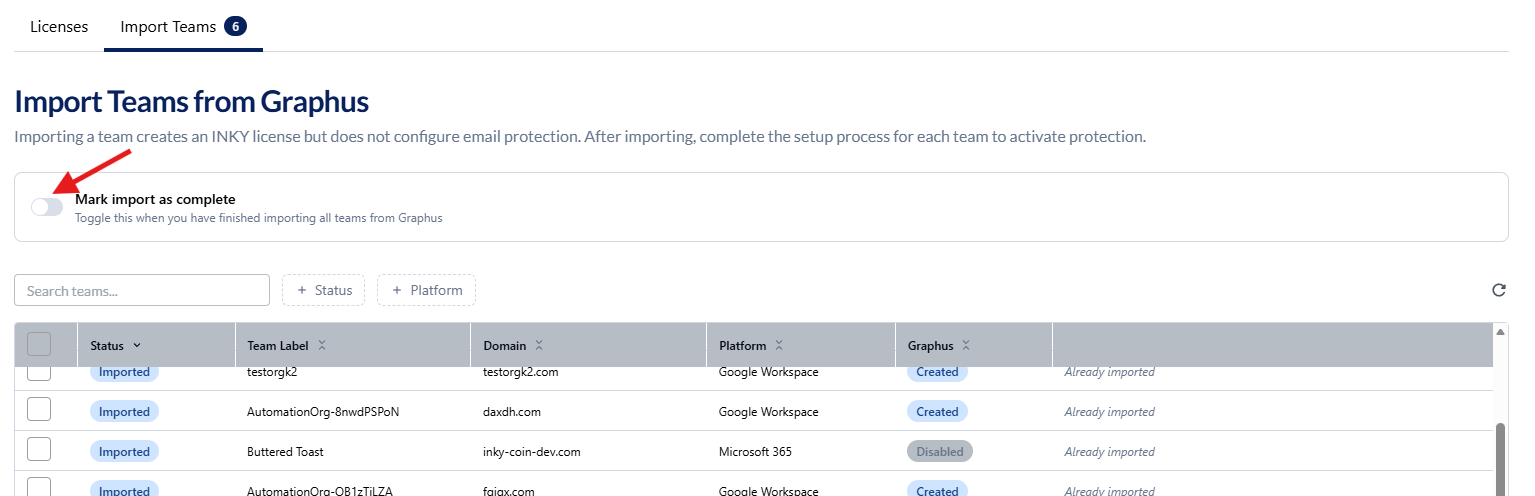
Confirm in the dialog

The Import Teams tab will be hidden. If you need to access it later, you can toggle it back on from the Licenses tab.
After Import: Next Steps
Once teams are imported, complete the setup:
Go to Team Setup and select the imported team.
Disable Graphus protection on the team. See Disable Graphus Prior to INKY Install.
Complete any remaining configuration steps (API access, mail routing, etc.).
Verify INKY protection is working correctly.
Troubleshooting
Team shows "Conflict" status
This usually means the domain already exists in INKY under a different team. Contact INKY support to resolve the conflict.
Admin emails not added
If some admins couldn't be added during import, you can add them manually from Admin Center → Admin Management after the import completes.
Import failed with error
Check the error message and retry. Common issues include network timeouts or temporary API errors. If the problem persists, contact INKY support with the error details.
Can't see Import Teams tab
Ensure your partner account has a matching Kaseya Salesforce ID. If you previously marked the import as complete, check the toggle at the bottom of the Licenses tab to show it again.