Autotask Ticketing Integration
Written By Matt Sywulak
Last updated About 14 hours ago
Autotask Smart Ticketing creates a ticket in your Autotask PSA whenever INKY detects a qualifying email security event.
Security and navigation
INKY NAVIGATION: Admin Center > Integrations > Autotask.
INKY PERMISSIONS: Super Admin or Policy Admin role required.
Autotask NAVIGATION: Autotask's own sign-in and application-approval screen (reached via the Authorize step in INKY).
Autotask PERMISSIONS: An Autotask account with permission to approve third-party application access.
Prerequisites
Your organization must be a Kaseya-provisioned MSP or MME partner. Legacy INKY accounts are not eligible and must migrate to a Kaseya SKU first. Contact your account team to start that process.
Setup must be done from that partner's root team or its associated customers' container. Child teams see a message that the integration is managed at the partner level instead of the setup wizard.
Autotask Smart Ticketing must be enabled for your account. If you don't see the Autotask card on the Integrations page, or the card reads Not available for this account, contact your Kaseya representative.
About this integration
Autotask Smart Ticketing is a one-way integration that creates a ticket in your Autotask PSA whenever INKY detects one of two kinds of qualifying email security events:
User reports: When an end user reports an email as Safe, Spam, or Phishing.
Account-takeover detections: When INKY opens a brand-new account-takeover enforcement. If that same enforcement is later escalated, INKY does not open an additional ticket for it.
Note: Account-takeover detection is available only with the INKY Pro license. For example, if an MSP has configured account-takeover detection but one of their customer teams has an Advanced license, that team won't have account-takeover detection capabilities.
When either event occurs, INKY checks whether ticketing is turned on for that alert type, determines which Autotask company the ticket belongs to, and creates the ticket with the category, priority, issue type, and sub-issue type you configured during setup.
The Category, Priority, Issue Type, and Sub-Issue Type options shown in the setup wizard are read live from your Autotask instance, so they always reflect your current Autotask configuration.
Setup consists of a three-step wizard on the Integrations page:
Authorize: Sign in to Autotask to authorize INKY in Autotask. Authentication occurs directly between your account and Autotask. INKY does not access or store your Autotask credentials. It receives only the authorization token required to establish the connection.
Ticket Creation: Select which alert types create tickets and configure the corresponding Category, Priority, Issue Type, and Sub-Issue Type values. These options are retrieved directly from your Autotask instance.
Company Mapping: Map each INKY team to the appropriate Autotask company. You can also specify a default company for teams that are not explicitly mapped.
Use case
Without this integration, MSPs running email security through INKY have no automated way to route INKY alerts into the PSA ticketing workflow they already use for everything else. Someone must notice the alert in INKY and create the ticket manually.
Autotask Smart Ticketing closes that gap for user-reported phishing, spam, and safe reports, and for account-takeover detections, so those alerts create tickets without manual work or custom integration effort.
How to...
Authorize INKY connection to Autotask
To authorize the connection, complete the following steps:
Select Admin Center > Integrations.
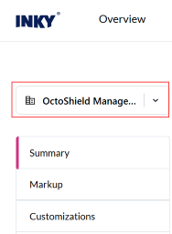
In the Team selector field, select the root organization (building icon), if not already selected.
Click the Autotask card.
Click Authorize with Autotask.
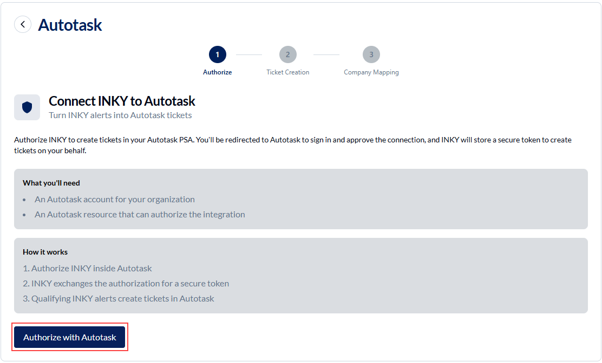
You're redirected to Autotask's own sign-in and approval screen. Sign in and approve access. INKY exchanges the resulting authorization code for a secure connection token and runs a validation check.
The Autotask connection status changes to Connected.
Configure ticketing
You can enable either alert type independently, or both.
To choose which alerts create tickets and how they're categorized, complete the following steps:
Select the User Reports check box to create tickets when your users report email, then choose which report types should create tickets. Safe, Spam, and Phishing each have their own toggle, so you can ticket only the report types you act on — a phishing-only configuration, for example.
Reports of your recognized phishing simulations do not create tickets unless you select Also create tickets for reports of your recognized phishing simulations. It is off unless you turn it on.
Complete the following fields. Unless otherwise noted, all fields are required. Available values are retrieved from your Autotask instance.
Ticket Category
Issue Type (optional)
Sub-Issue Type (optional)
A priority for each report type you enabled — Safe Report Priority, Spam Report Priority, Phishing Report Priority. A priority is required only for the report types you turned on.
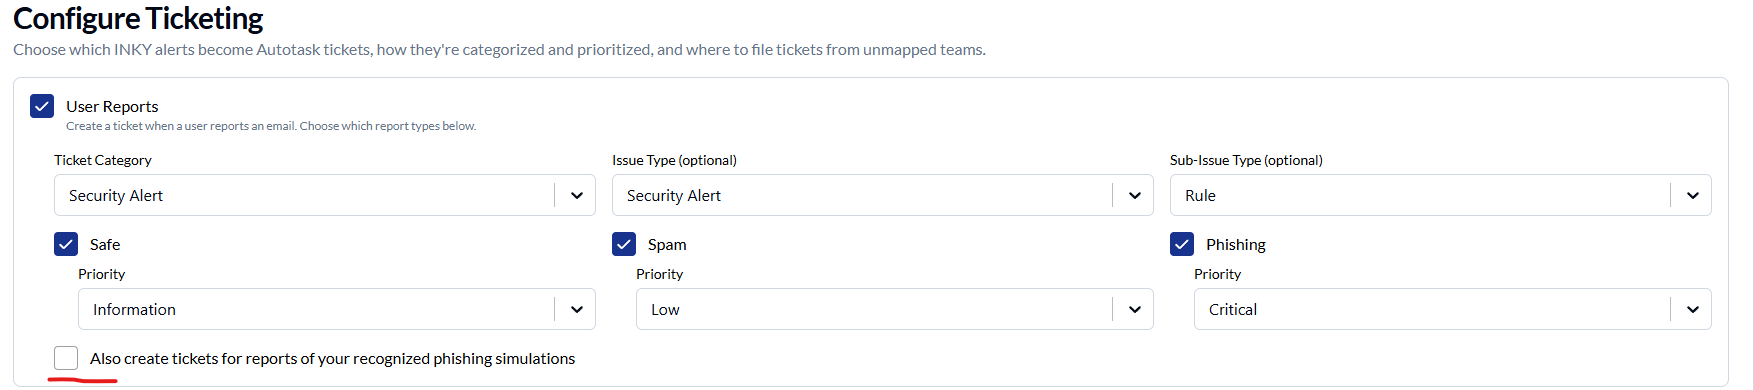
Note: Per-report-type ticketing is off by default and enabled per team. Connections configured before it was introduced have all three report types enabled, so the tickets you receive do not change until you edit the configuration.
Select the Account-Takeover Detections check box to create a ticket when INKY detects a potential account takeover.
Complete the following fields. Unless otherwise noted, all fields are required. Available values are retrieved from your Autotask instance.
Ticket Category
Issue Type (optional)
Sub-Issue Type (optional)
Account Takeover Priority

Under Teams Without a Company Mapping, select what happens when an alert comes from a team that isn't mapped to an Autotask company. This setting also applies to teams added later.
Use a default company. File those tickets under one Autotask company that you select.
Don't create a ticket. Skip ticket creation for unmapped teams.

Click Save settings. If a required field is missing for an enabled alert type, INKY displays an inline validation message and prevents the settings from being saved until the issue is resolved. To discard your edits instead, click Revert changes.
Map INKY teams to Autotask companies
To make sure each team's tickets land in the right Autotask company, complete the following steps:
Click Manage mappings.
Map each INKY team to the corresponding Autotask company by selecting a company in the right column. Each mapping is saved automatically when selected. Use Search teams to find a specific team, or Show unmapped only to narrow the list. A counter at the top shows how many of your teams are mapped.
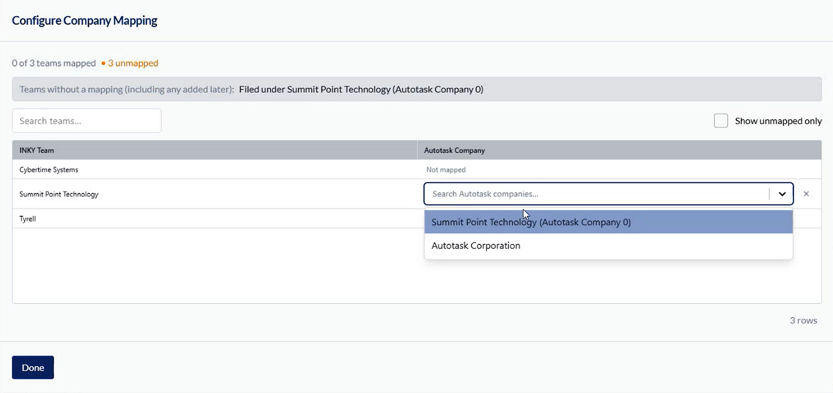
When finished mapping, click Done.
Click Save settings.
Once mapping is complete, qualifying alerts automatically create tickets in the correct Autotask company. No further action is needed.
Note: If all of the INKY teams are not mapped to an Autotask company, step three of the wizard remains incomplete.

Disable, reconnect, or disconnect the integration in INKY
The following options are available on the Integrations page once you're connected:
Disable: Pauses ticket creation going forward. Your connection, category and priority selections, and team-to-company mappings are all kept. Re-enabling resumes ticket creation immediately, with no need to reauthorize. Tickets already created in Autotask are not changed.
Reconnect: Re-runs the authorization if the connection stops working. Your ticket settings and team mappings are not changed.
Disconnect: Requires confirmation. Clears the stored connection, and the integration shows as Not Connected. Your team mappings and ticket-creation settings are kept, so re-running the Authorize step restores your prior configuration without repeating the whole wizard.
Choose Disable to temporarily pause the integration. Choose Disconnect to revoke INKY's access to Autotask and remove the connection.
FAQ
Will I get duplicate tickets for the same alert?
No, not under normal circumstances.
INKY builds a consistent title for each alert. If Autotask receives a matching title within its own duplicate-detection window, it collapses the new ticket into a note on the existing ticket instead of creating a second one. INKY relies on this built-in Autotask behavior rather than tracking duplicates itself.
What if a ticket doesn't get created?
Check whether the selected Category, Priority, Issue Type, or Sub-Issue Type still exists in Autotask.
If one of those was renamed or removed in Autotask after setup, ticket creation for that alert type stops working without notifying you. Return to the Ticket Creation step and reselect the affected fields to restore it.
How will I know if a ticket was created from an INKY alert?
Tickets created from INKY alerts can be identified by their title, which begins with either INKY Report or INKY ATO.
Each ticket also includes a link that takes you directly to the associated message in INKY.
Can I turn off ticket creation for all my customers at once?
Not as a single action today.
Ticket creation is controlled per tenant. To pause it everywhere, you must disable each tenant's connection individually or remove your Autotask partner credentials.
I'm an existing INKY customer. Can I use Autotask Smart Ticketing?
Only on a Kaseya SKU.
Autotask Smart Ticketing is available to Kaseya-provisioned MSP and MME partners. If your account predates that model, you must migrate to a Kaseya SKU before the integration becomes available. Your account team can explain what that involves.
Is this the same as the Autotask integration used for billing and usage reporting?
No, they're unrelated.
Autotask Smart Ticketing doesn't share any tokens, data, or configuration with any other Autotask-named integration used for billing or usage reporting.
Does INKY see or store my Autotask login credentials?
No.
You sign in directly on Autotask's own sign-in screen. INKY receives and stores only the resulting connection token. It never receives your username or password.
Was this helpful?
Still need help? Ask the team